

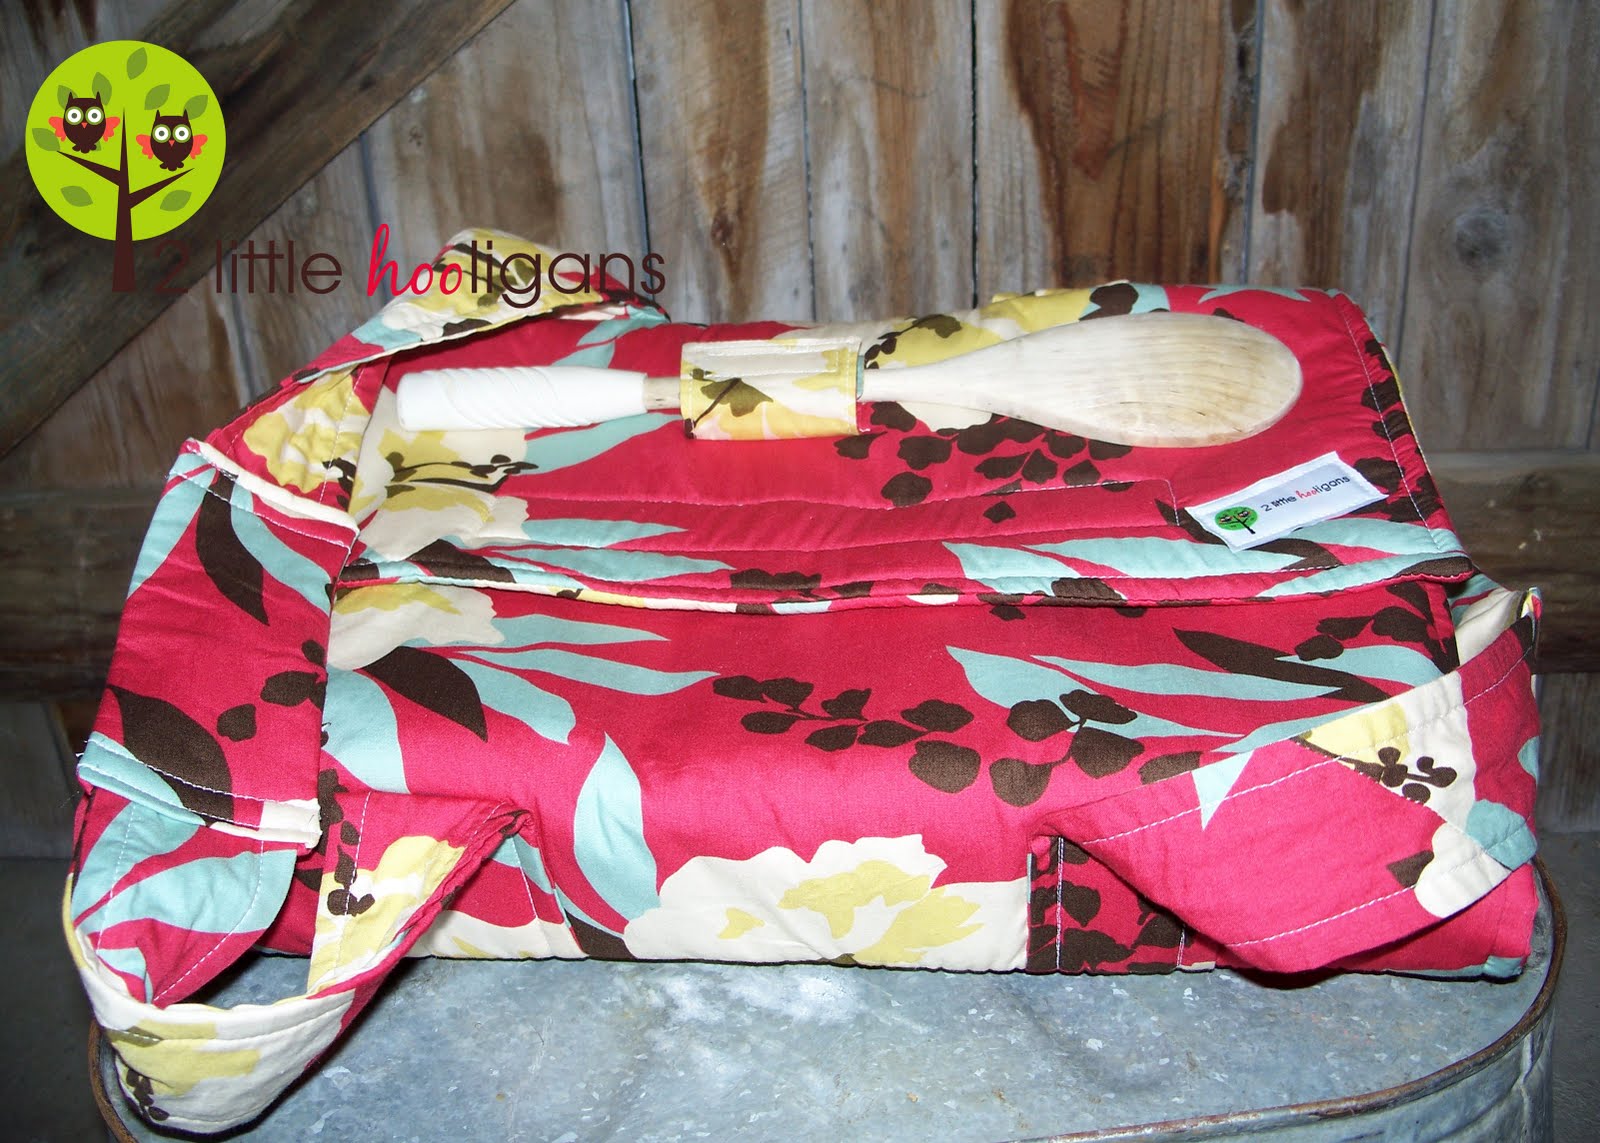
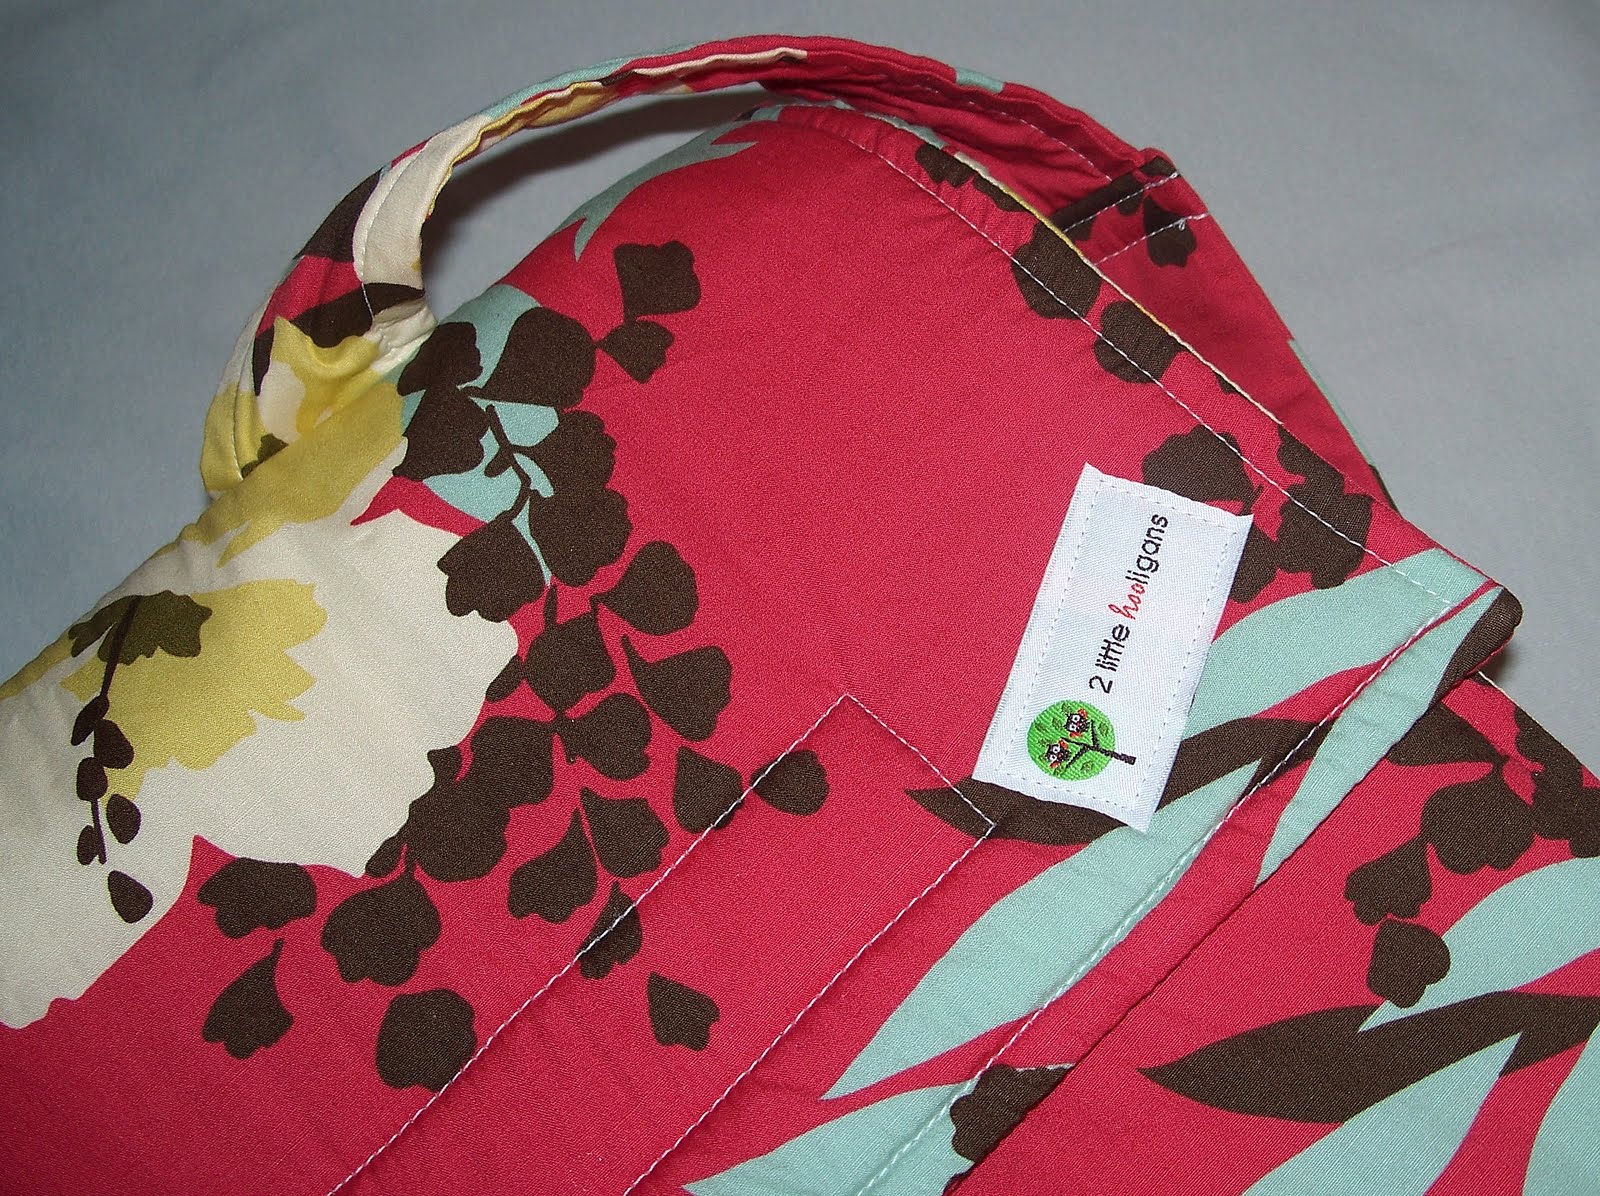
I am really excited to share this with all of you. This is unlike any other casserole carrier you have ever seen. I love that the handles are made of fabric and are not wooden dowels. I think it gives the carrier more stability. I also like that it is lined with Insul-Bright to keep your casserole dishes warm or cold while transporting. With that said, I do not recommend taking dishes directly from the oven and placing into carrier. It may work, but I’m not going to try that one. Just let the dish cool a bit first. The carrier is made of all machine washable fabrics, so wash away. I suggest line drying instead of placing into the dryer. Casserole carrier will hold a 8×12 or 9×13 rectangular pan. (Please forgive me on the pictures. I hope you are all able to see my stitches. I used the darkest fabric I had and used white thread. But I was taking these pictures in the middle of the night and the lighting was not so good.)
Don’t let all the steps scare you. I tried to make this tutorial as easy as possible for everyone to follow along. It really is easy. Your just taking two pieces of fabric and making a cross with them and attaching some handles. I hate to think that my ideas are basic, but they are!
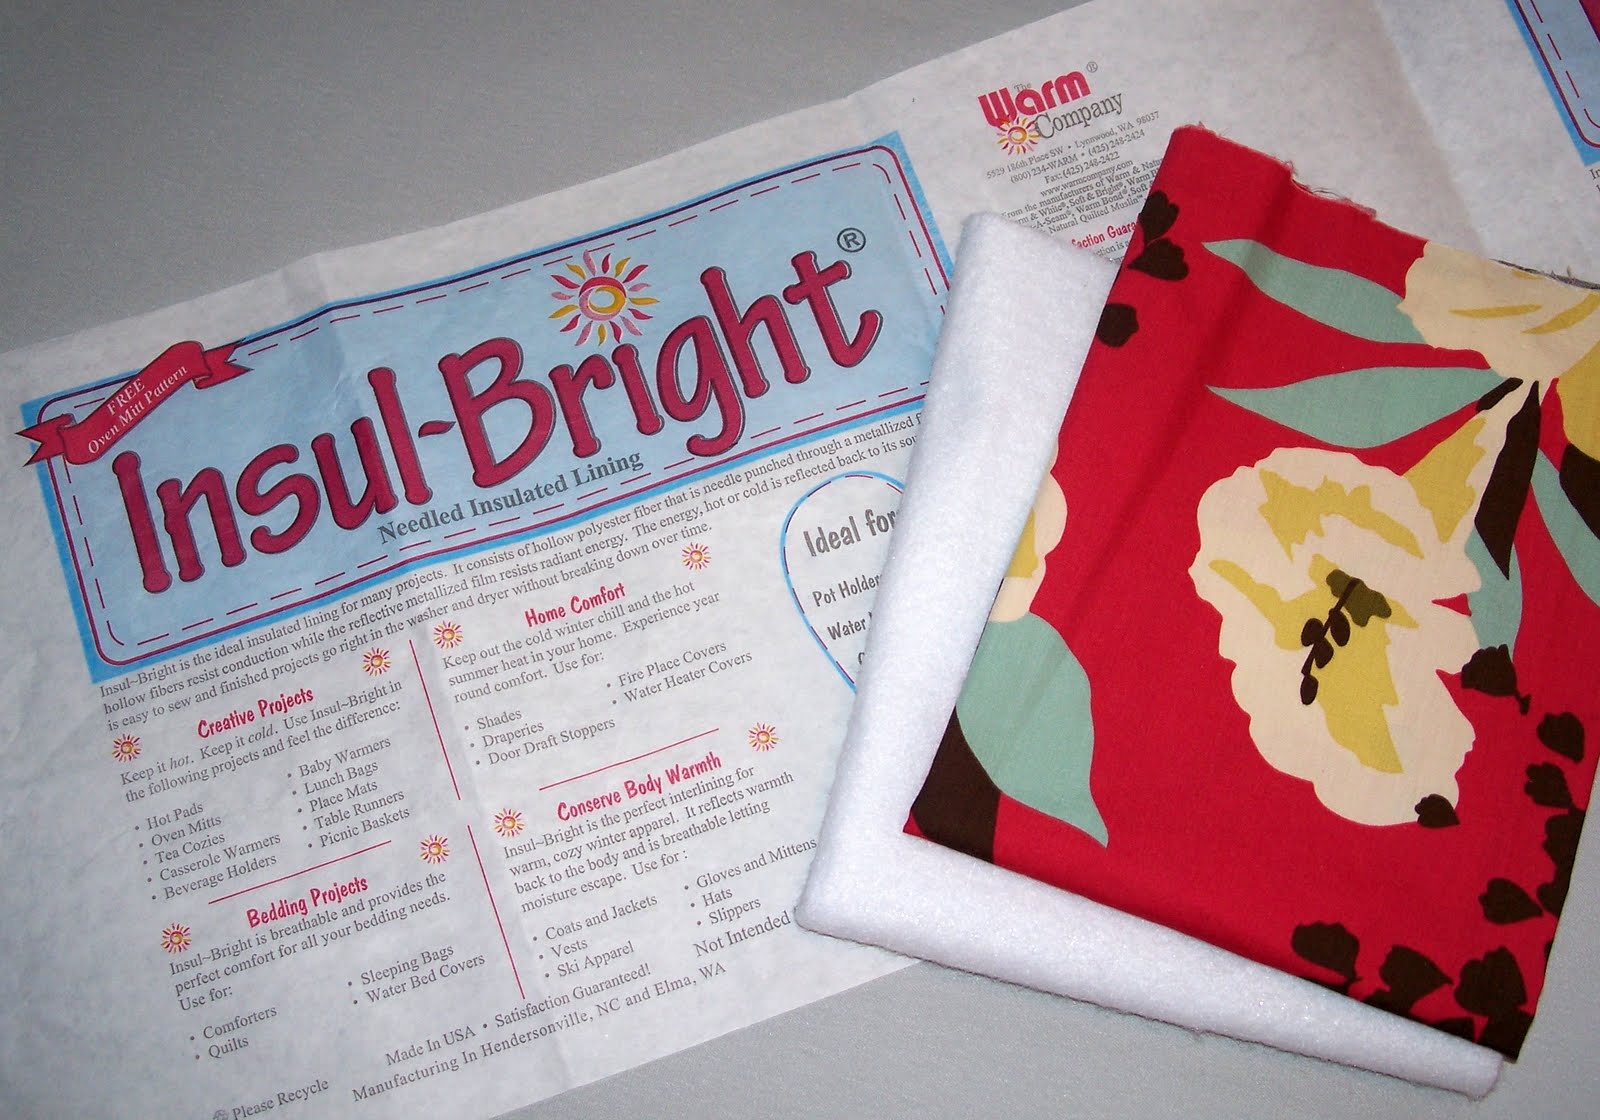
Materials Needed:
*Insul-Bright (1 yard, make sure it is 44″ x 36″)
*medium or light weight cotton fabric (2 yards of fabric)
*2″ wide Velcro ( 24″ of 2″ wide Velcro)
Let’s get started!
We will be cutting materials along the way instead of cutting all of the materials ahead of time.
 Cut two pieces of Insul-Bright to the following sizes: 30″ X 15″ and 37″ X 12″
Cut two pieces of fabric slightly larger then the 30″ X 15″ and 37″ X 12″ pieces of Insul-Bright.
You don’t have to be too picky on cutting out the fabric pieces because you will be trimming them later. I just find it quicker to sew the pieces together this way and trim the fabric off later. Plus it saves you time from having to cut out the pieces of fabric to the correct size.
Gather the 30″ X 15″ piece of insul-bright and the two pieces of fabric that you cut out to go along with it. Take the two pieces of fabric and lay flat with right sides facing and now place the Insul-Bright on top of the fabric like shown.
Sew all around pinned pieces using the edge of insul-bright as your guide. Leave a 3″ opening for turning right side out.
**note: I changed the foot on my machine to H at this point. It is a plastic foot that glides over the Insul-Bright instead of getting caught up on the material. I didn’t do this on my first casserole carrier but did it on this one and it made a huge difference. Change foot back once finished sewing directly on the Insul-Bright.**
 Trim excess fabric except where the opening is, you want to leave that section a little longer so that when you turn right sides out it will tuck and sew shut nicely. Don’t forget to square off corners. Now pull fabric out through opening.
 Iron and push out corners so that they are nicely pointed. Now top stitch around the entire piece of fabric.
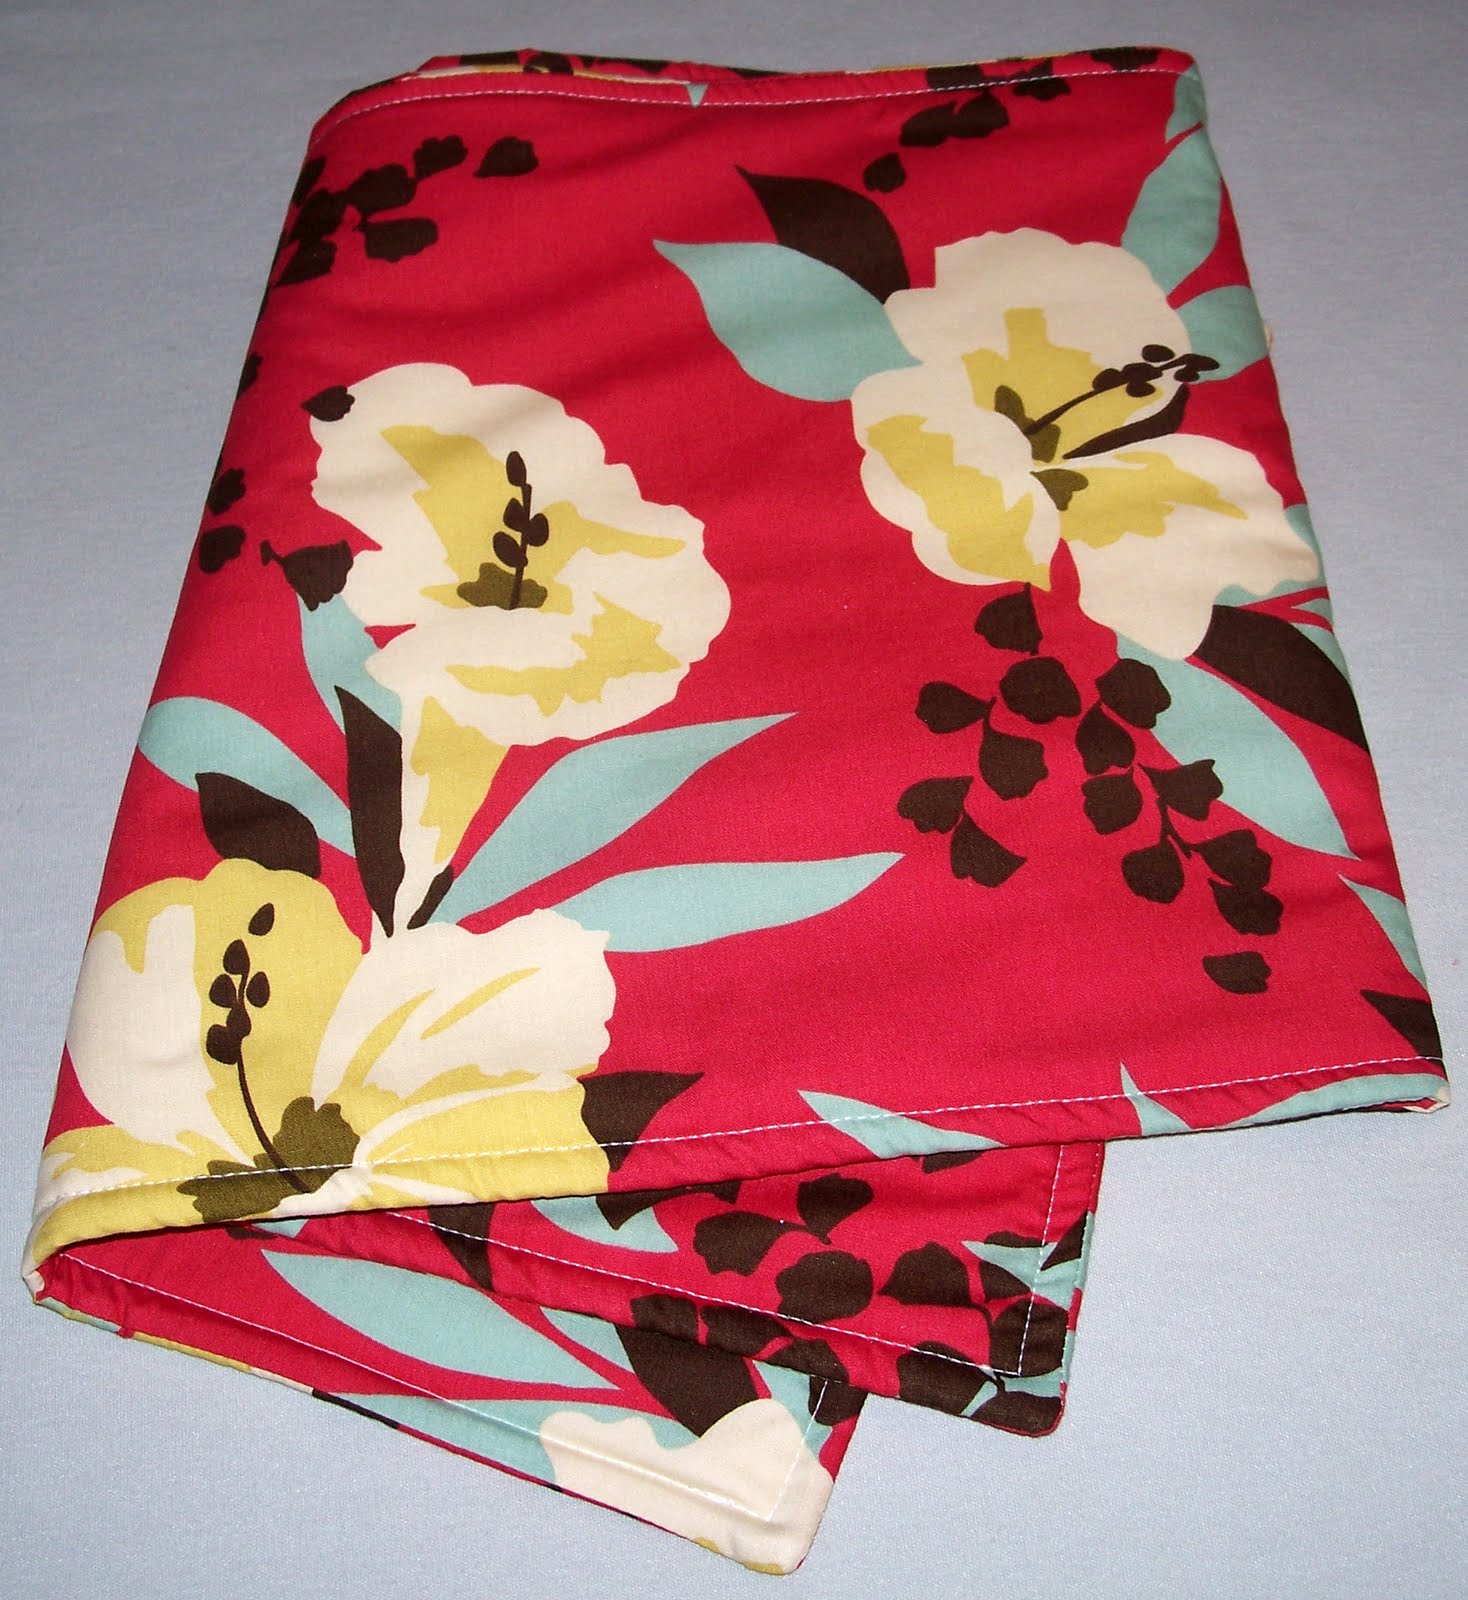 Repeat with the 37″ x 12″ of Insul-Bright and fabric pieces.
Pieces should look like this now.
 Lay the pieces out on top of each other making a cross like pictured below.
Make sure the 37″ X 12″ piece is on top.
Line them up straight. The right side of the 37″ x 12″ piece sticks out about 10″.
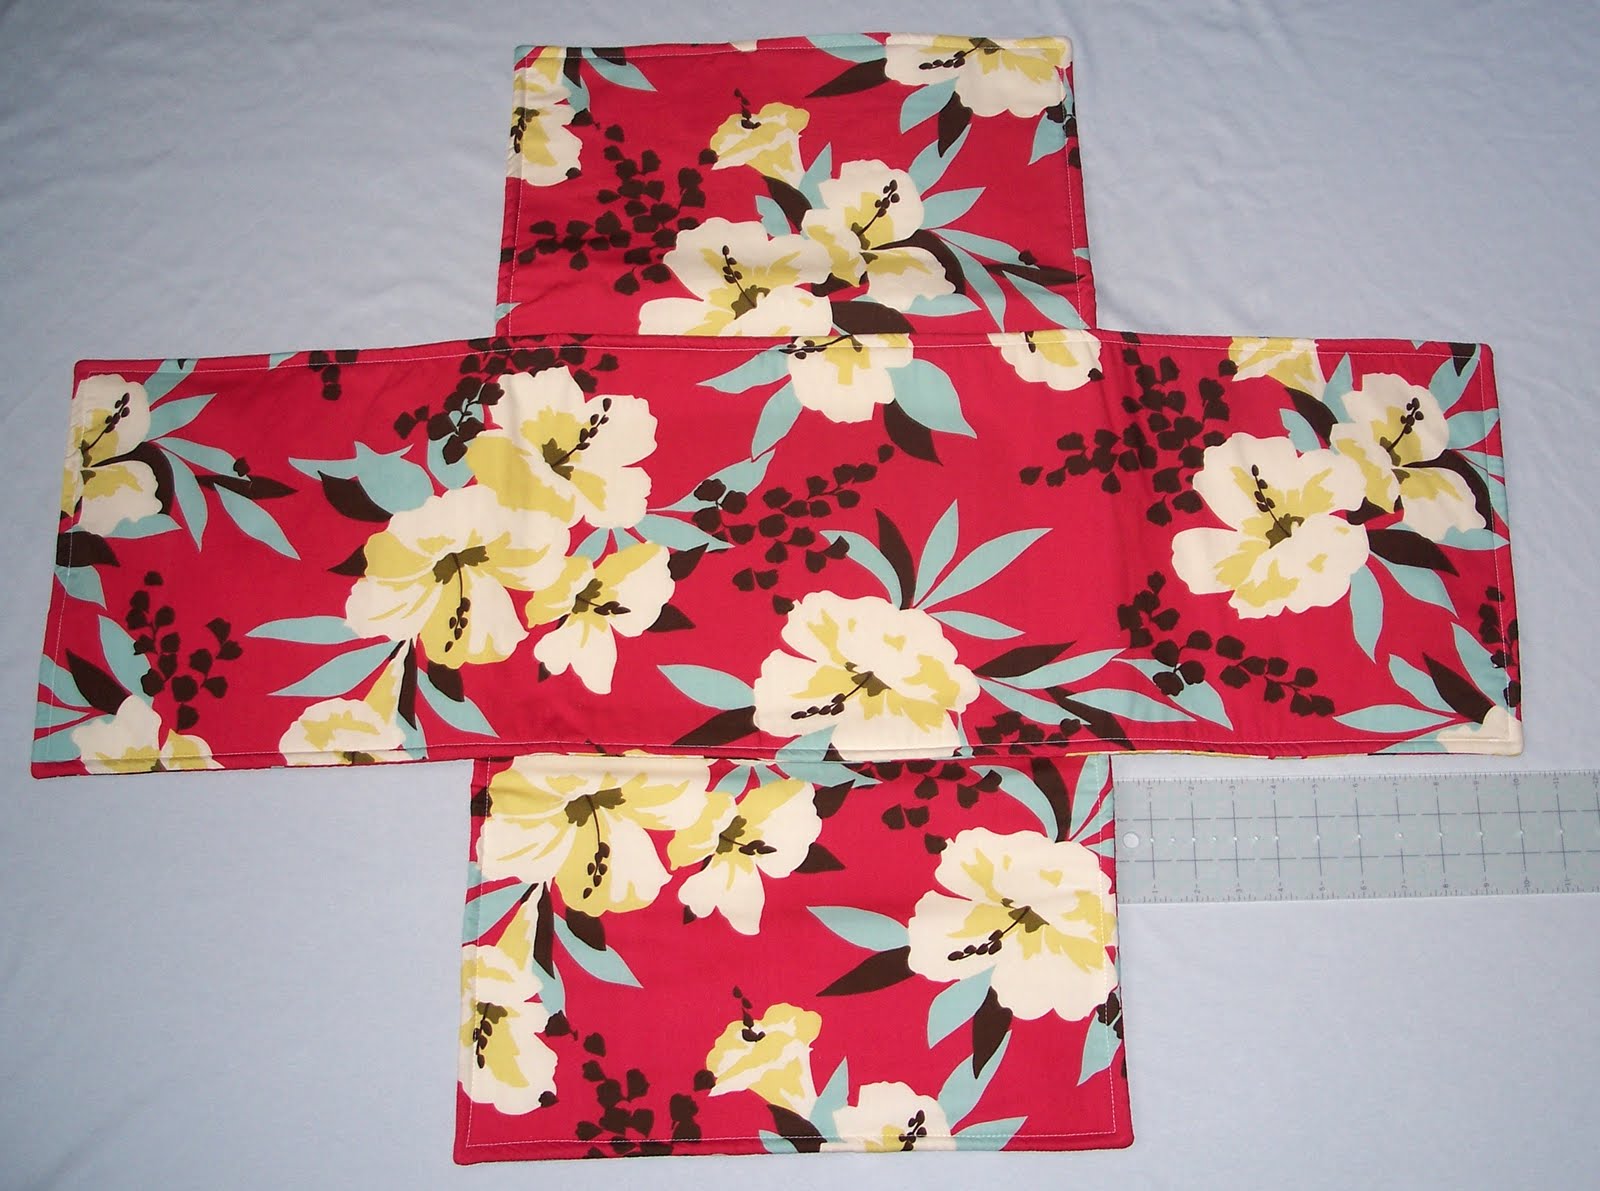
 And measures 9″ up from the bottom.
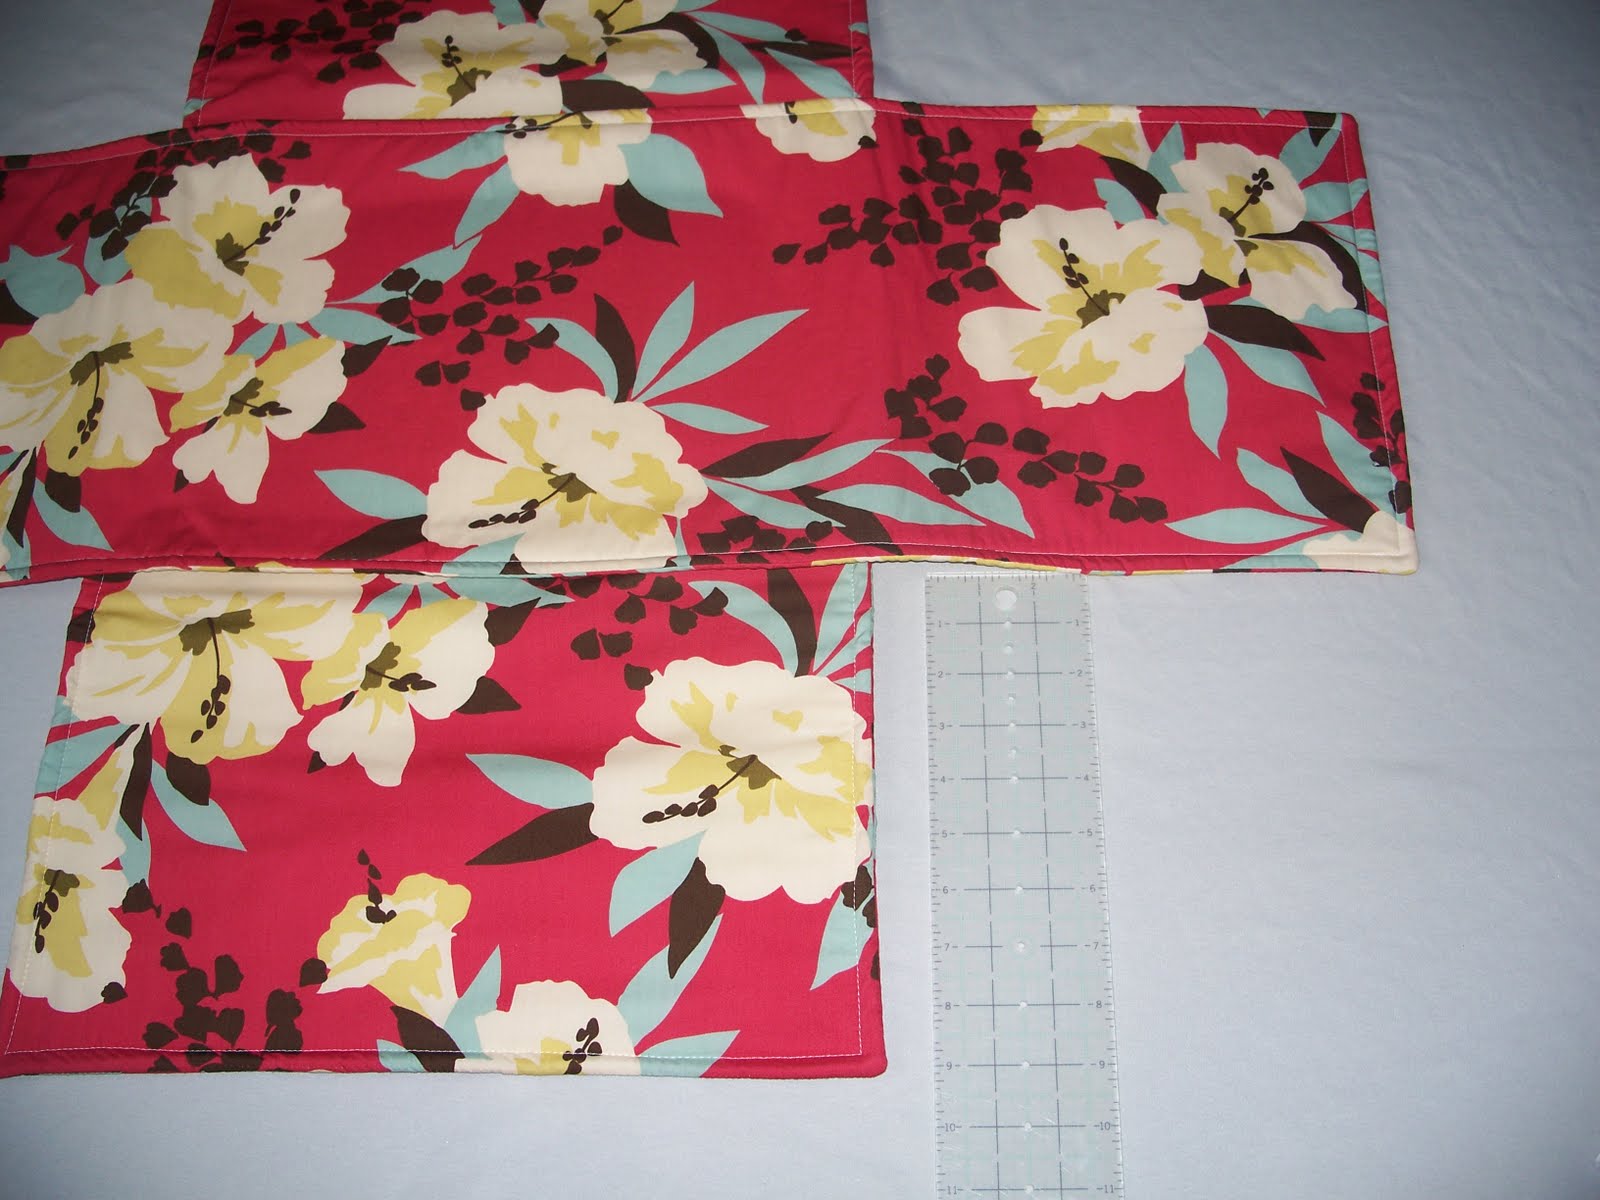 Mark on the bottom piece of fabric where the top piece of fabric is positioned on it. Make sure you make marks onto the top piece of fabric where the bottom piece is positioned underneath it as well. This doesn’t mean anything now, but it will help in later steps.
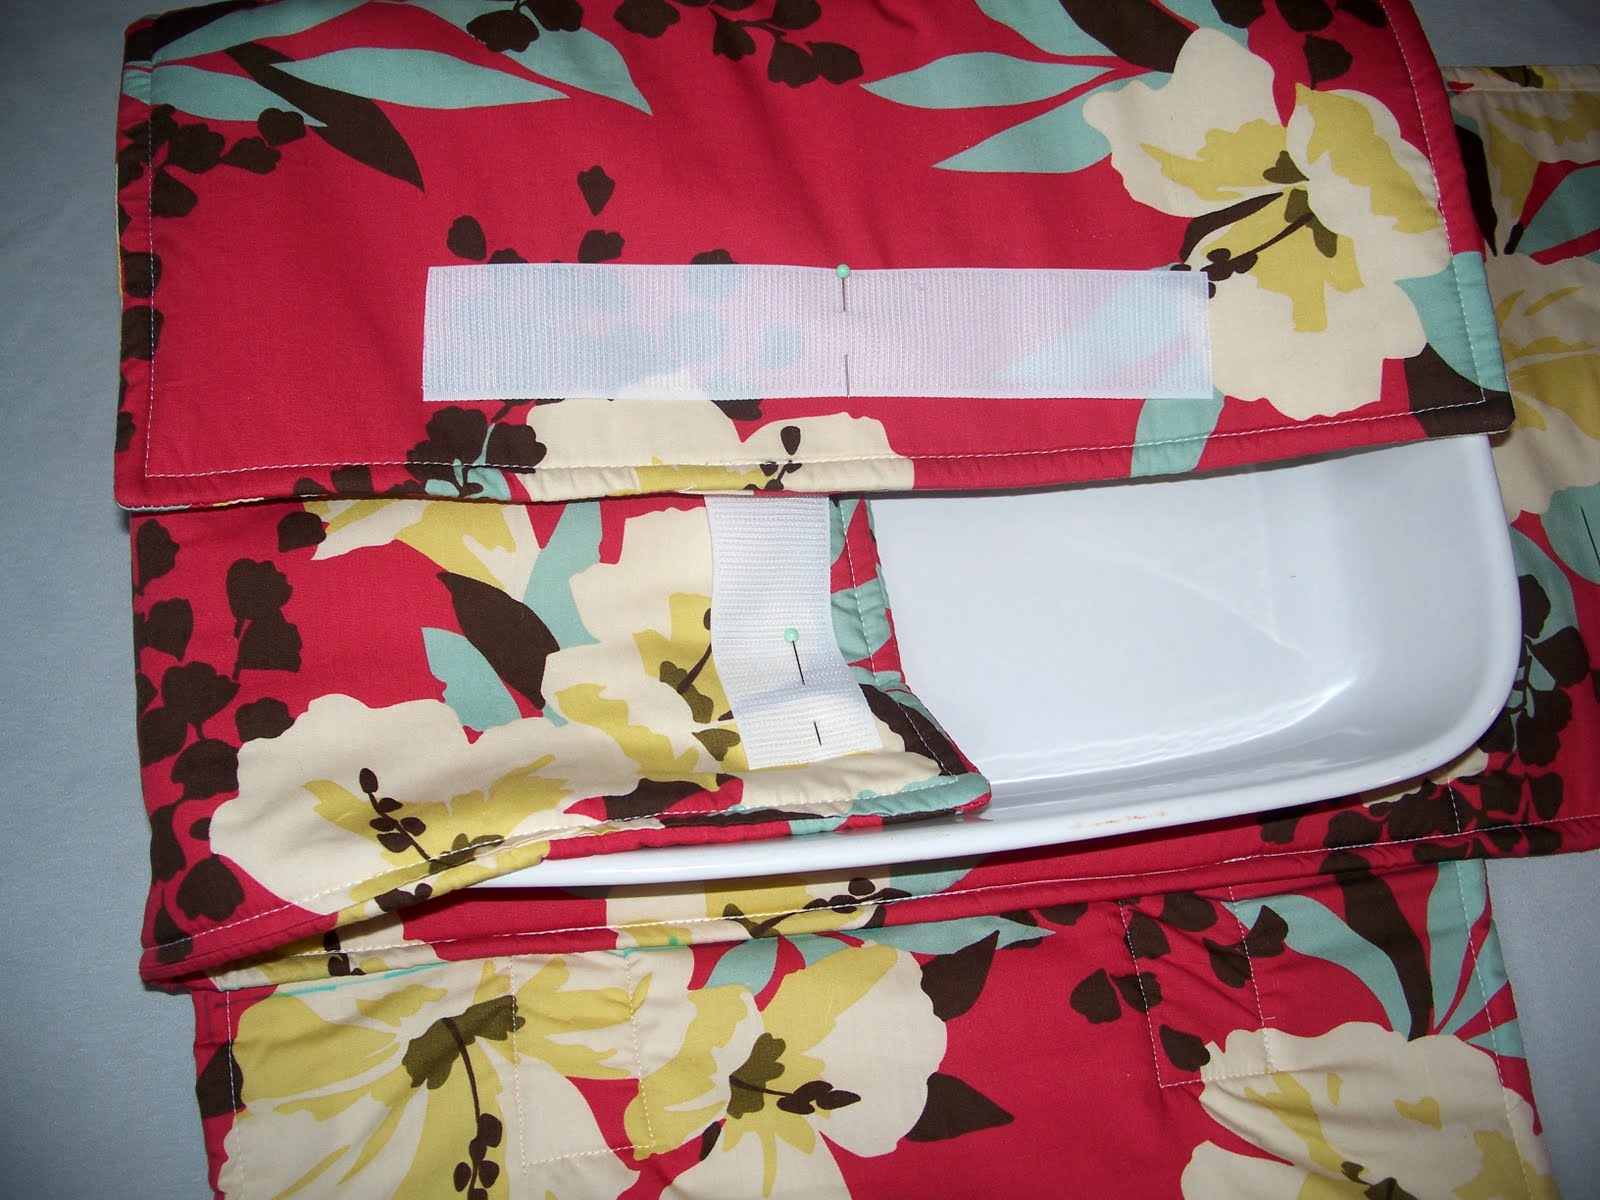
Now place a casserole dish in the center of the two pieces and fold closed. Fold the 37″ x 12″ piece close first then fold the 30″ x 15″ piece closed next.
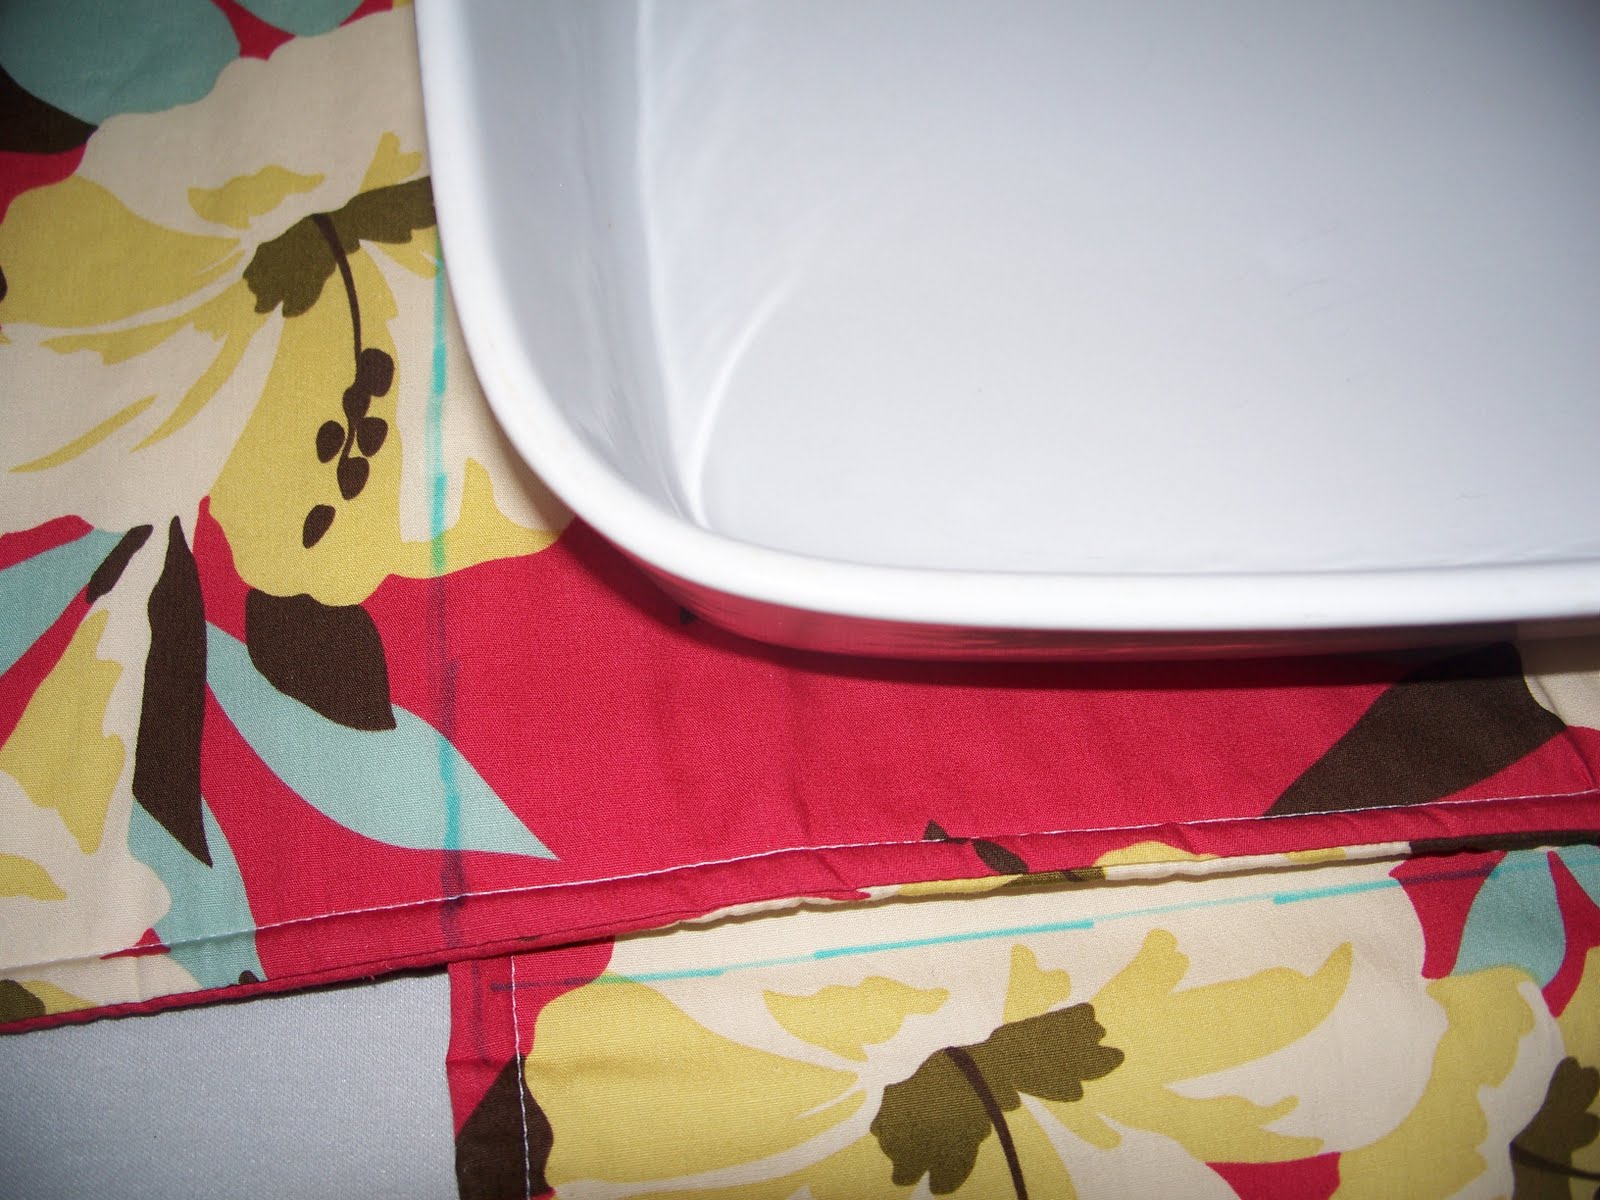 Now you are going to feel for the top of the casserole dish and make a mark on the fabric where the top of the dish is. This mark will tell you where to stop sewing when attaching the handles.
See my little mark? Now take a ruler and extend that mark the entire length of the fabric to show where the top of the casserole dish is. Repeat on the opposite side.
Set aside for now.
 Now it is time to make the handles.
Cut four pieces of fabric 40″ X 2 1/2″. Cut two pieces of flannel or batting the same size. Layer with the flannel on the bottom and the two pieces of fabric right sides facing on top of the flannel.
Sew together on both sides, the entire length of the pieces. Flip right side out, iron and top stitch.
Handles should look like this.
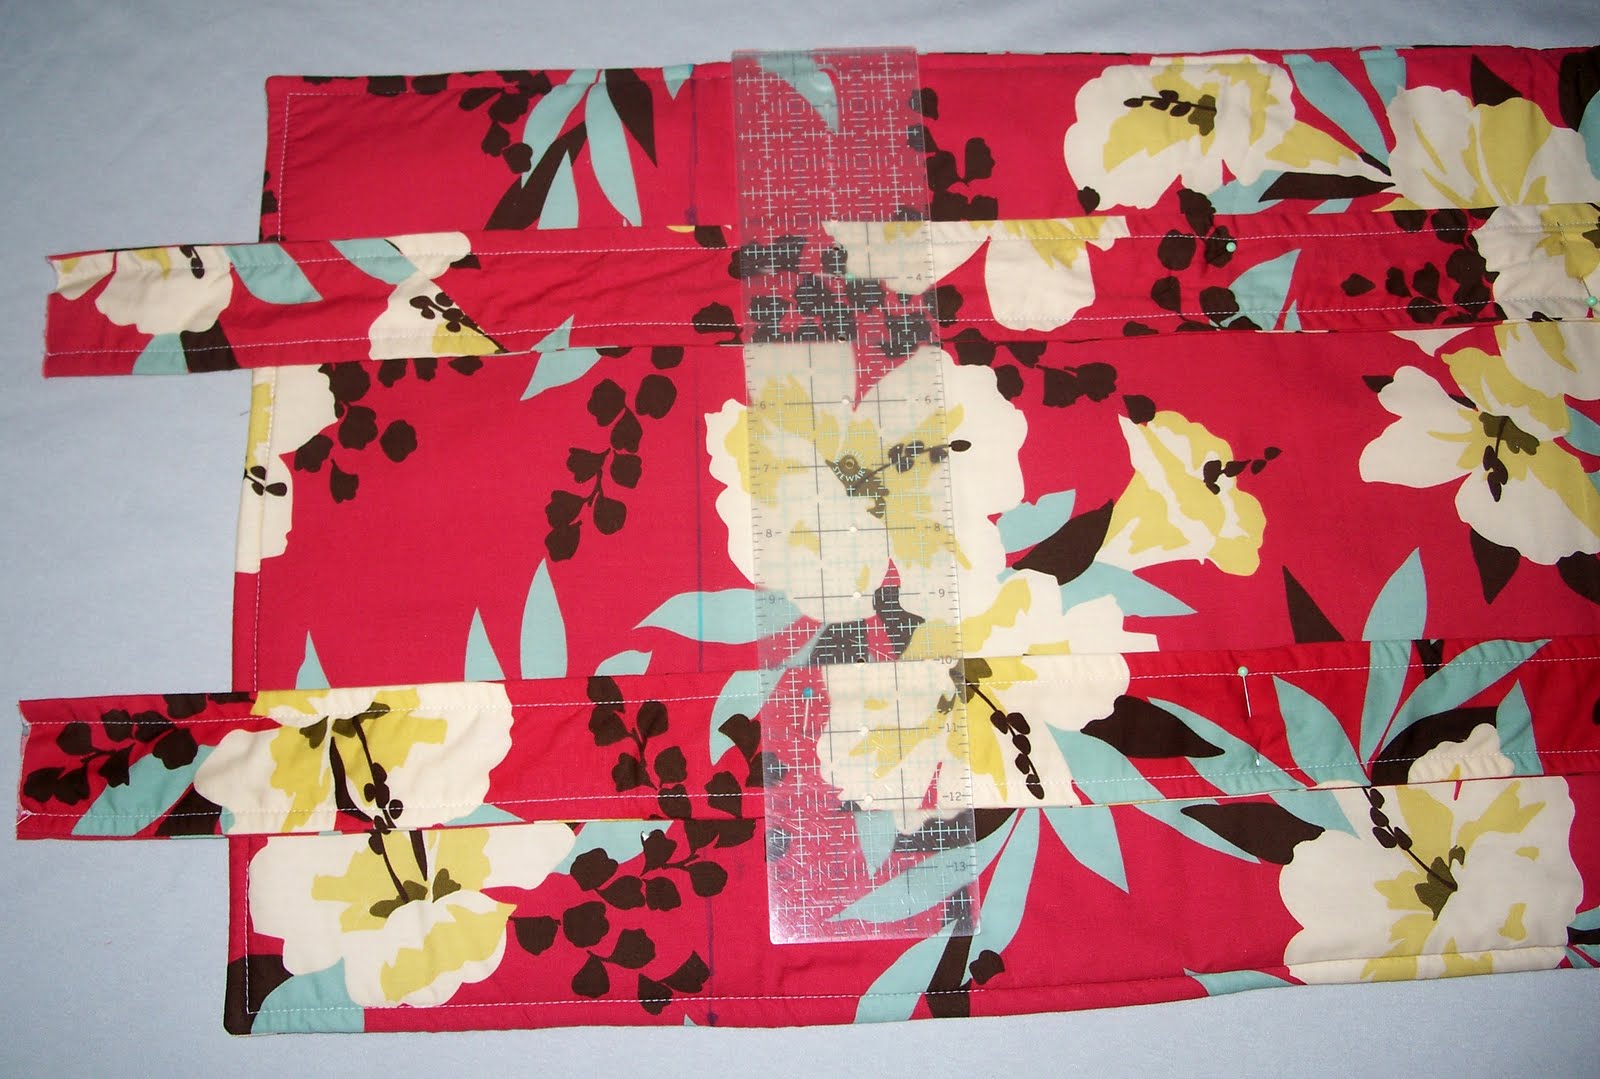
 Time to attach the handles you just made. Gather the 30″ x 15″ piece, this is the piece you will be attaching the handles to.
Remember the marks you made earlier when you used the casserole dish as a guide? well, this is where those marks you made from the top of the casserole dish come in handy. See them on the picture above?
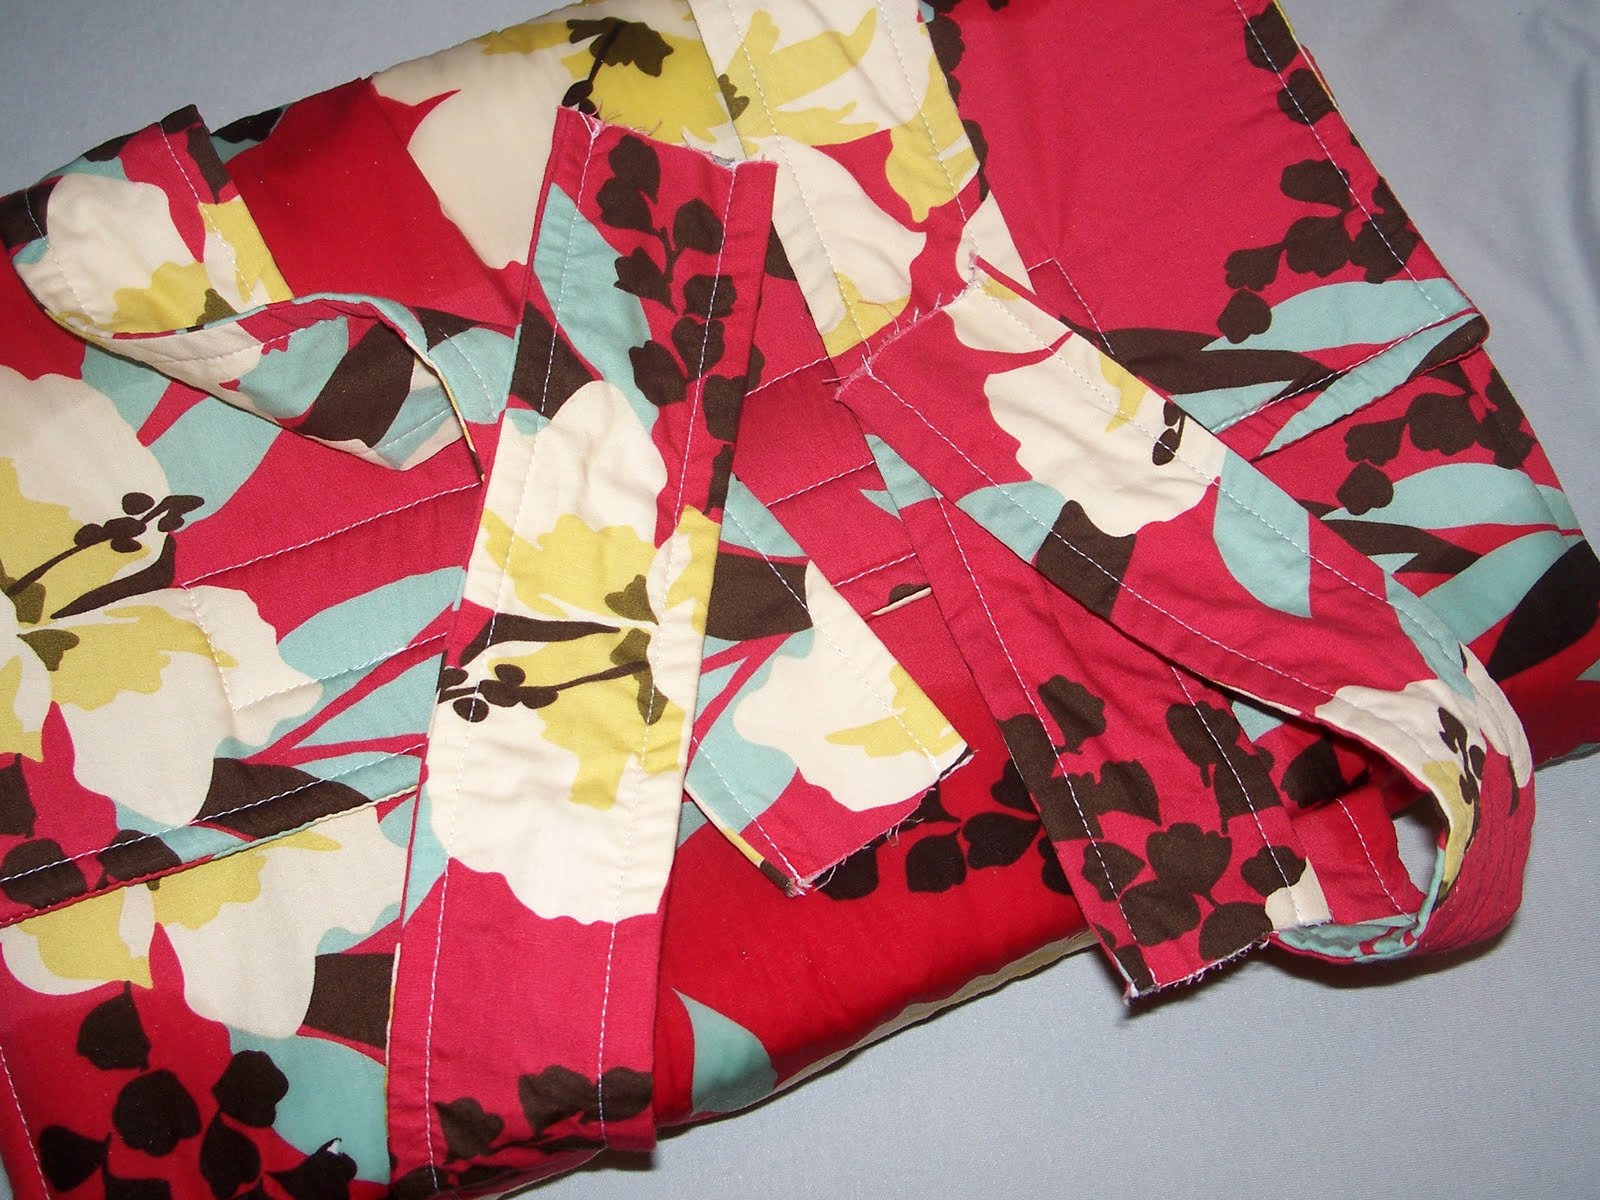
You will want to line up the handles as pictured above. Make sure they are evenly spaced and about 3″ in from the edge. Make sure the middle of the handles are in the middle of the piece of fabric. You don’t want lop sided handles.

 Sew the handles on. Use the top stitch that you did on the handles as a guide, and stitch right on top of those stitches again. Do not sew past the marks on the fabric showing you where the top of your casserole dish will be. You want to make sure you sew straight lines. These will be seen on the bottom of the carrier.
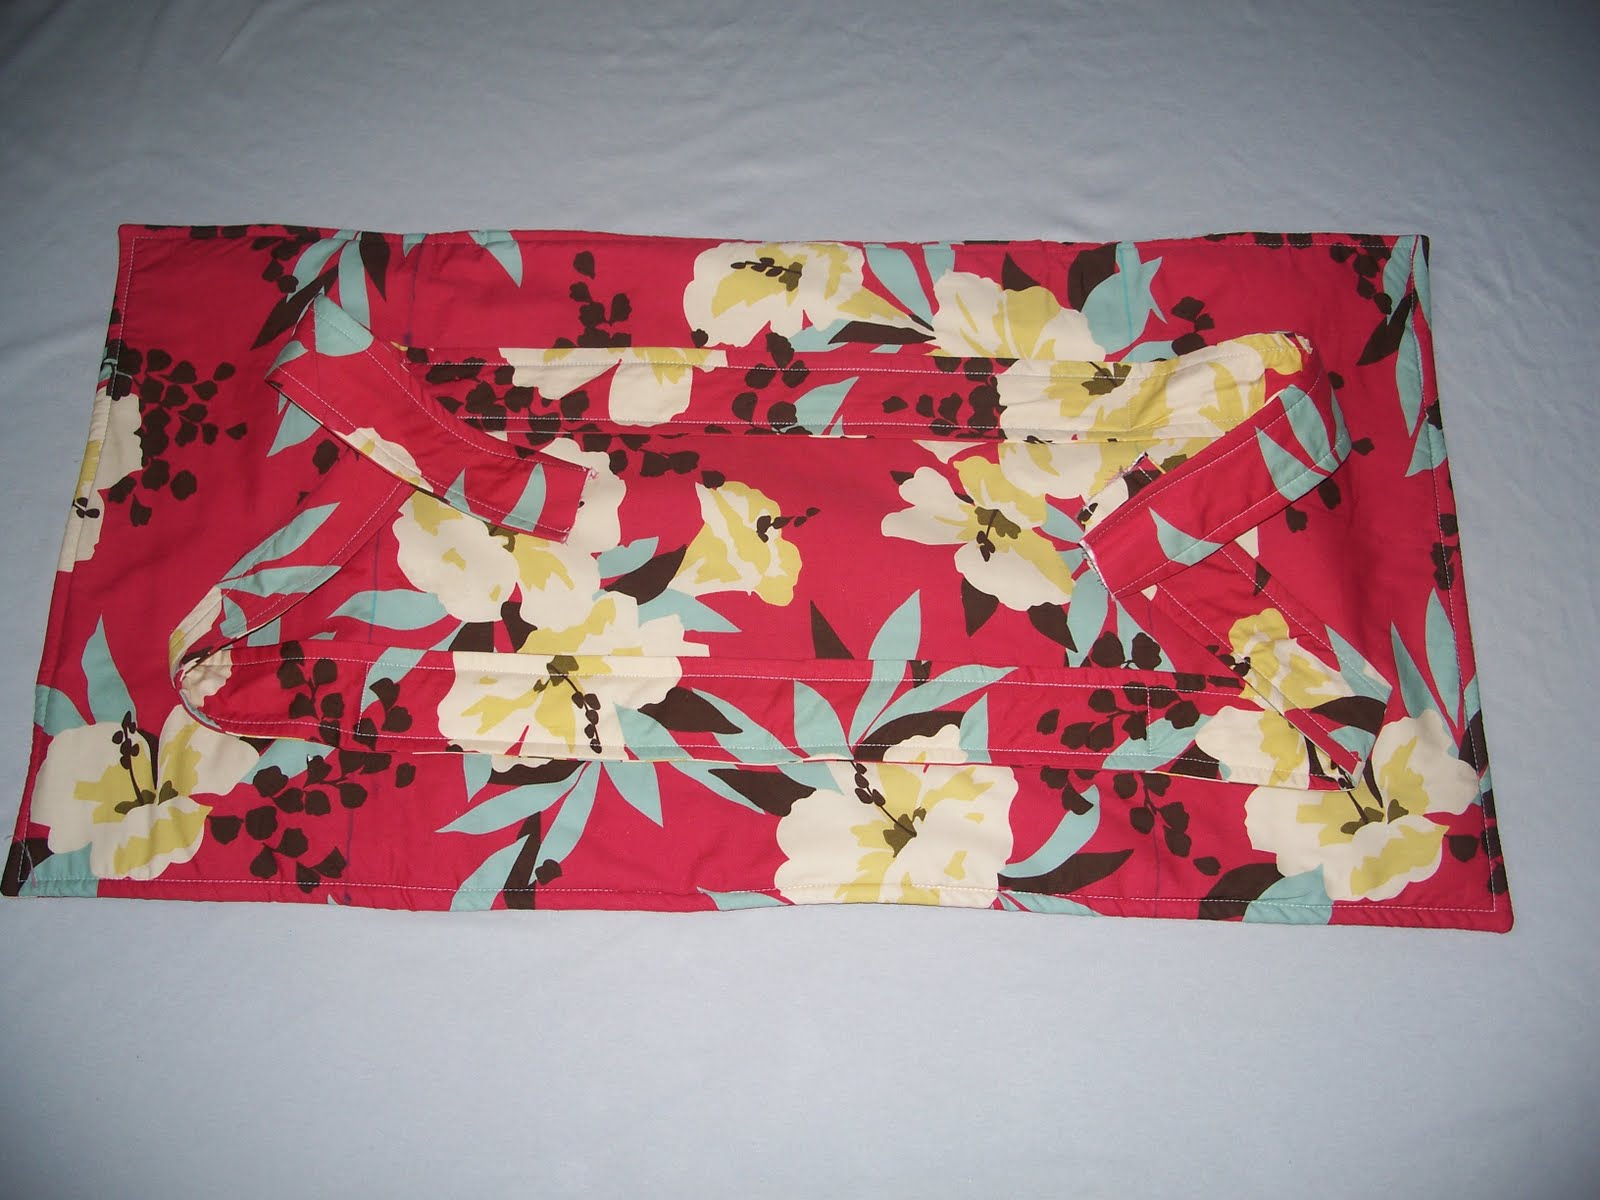
 Pieces should look like this now.
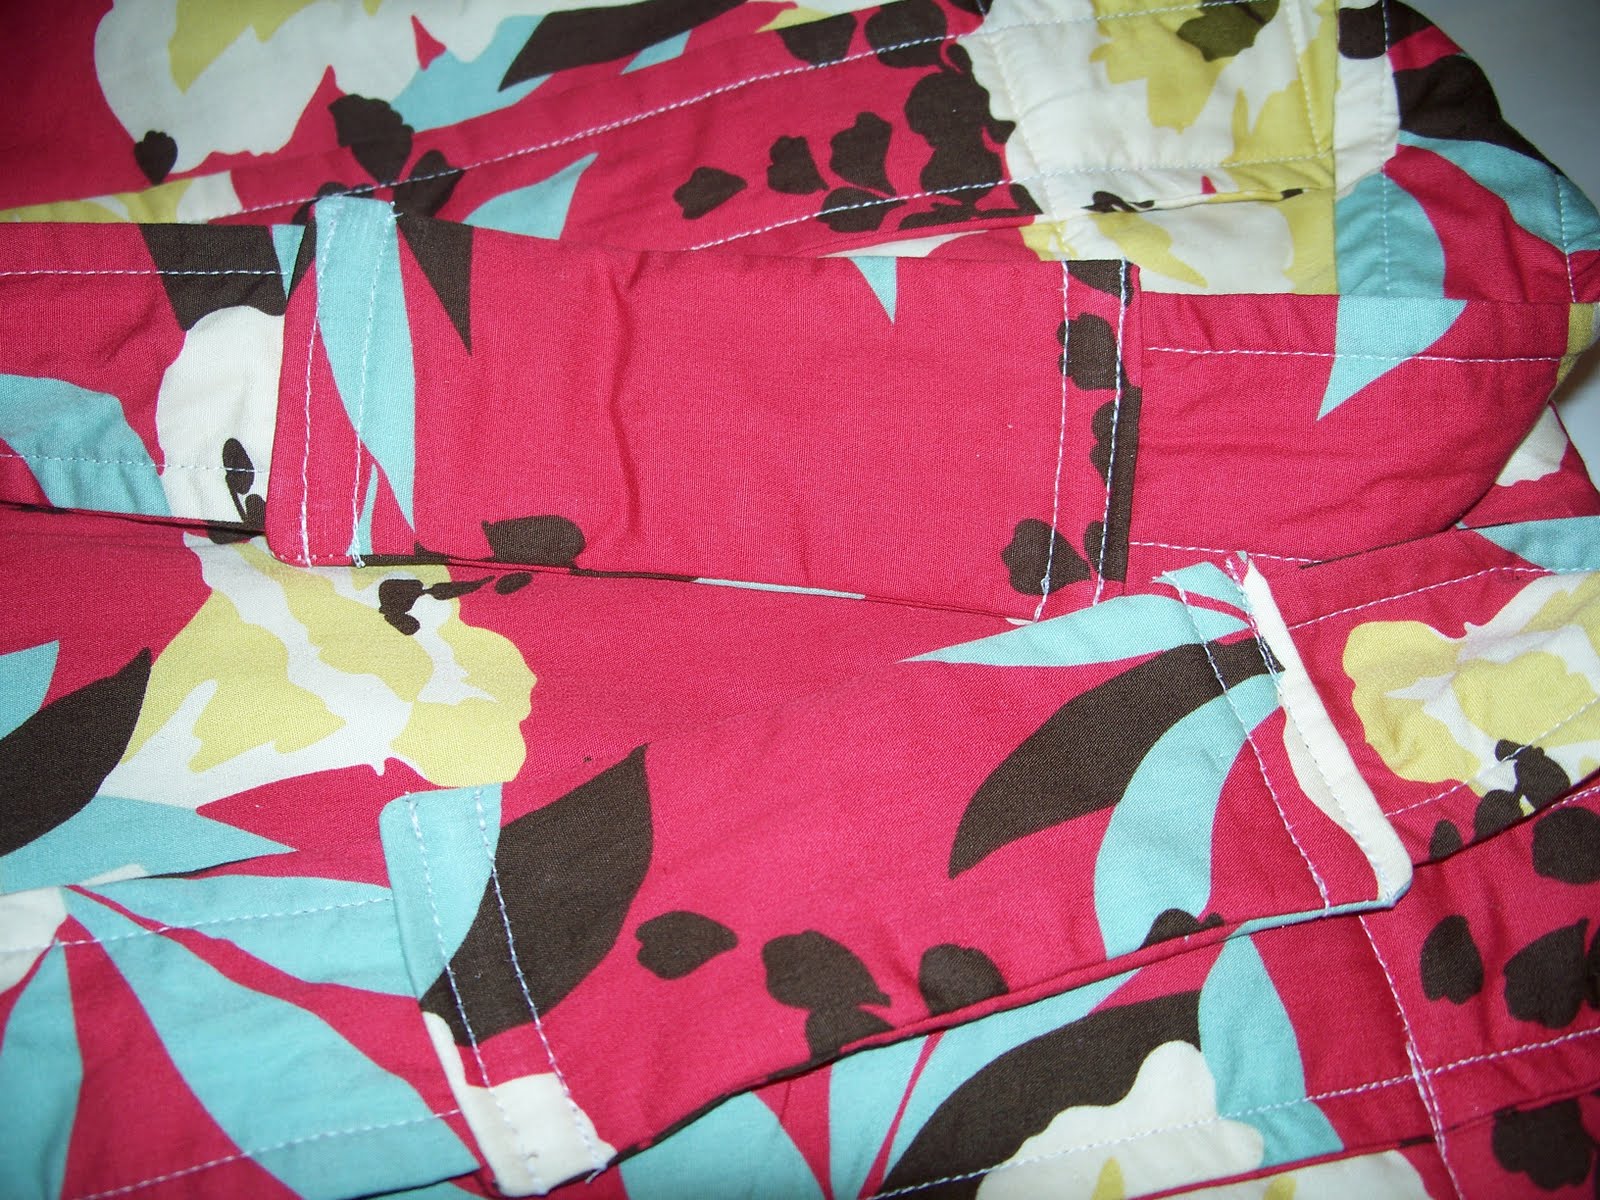
 Now it is time to attach the two pieces together.Line the pieces up again like you did when you first made the cross. Remember the 37″ X 12″ fabric is on top and the fabric with the handles is on the bottom. Pin in place.
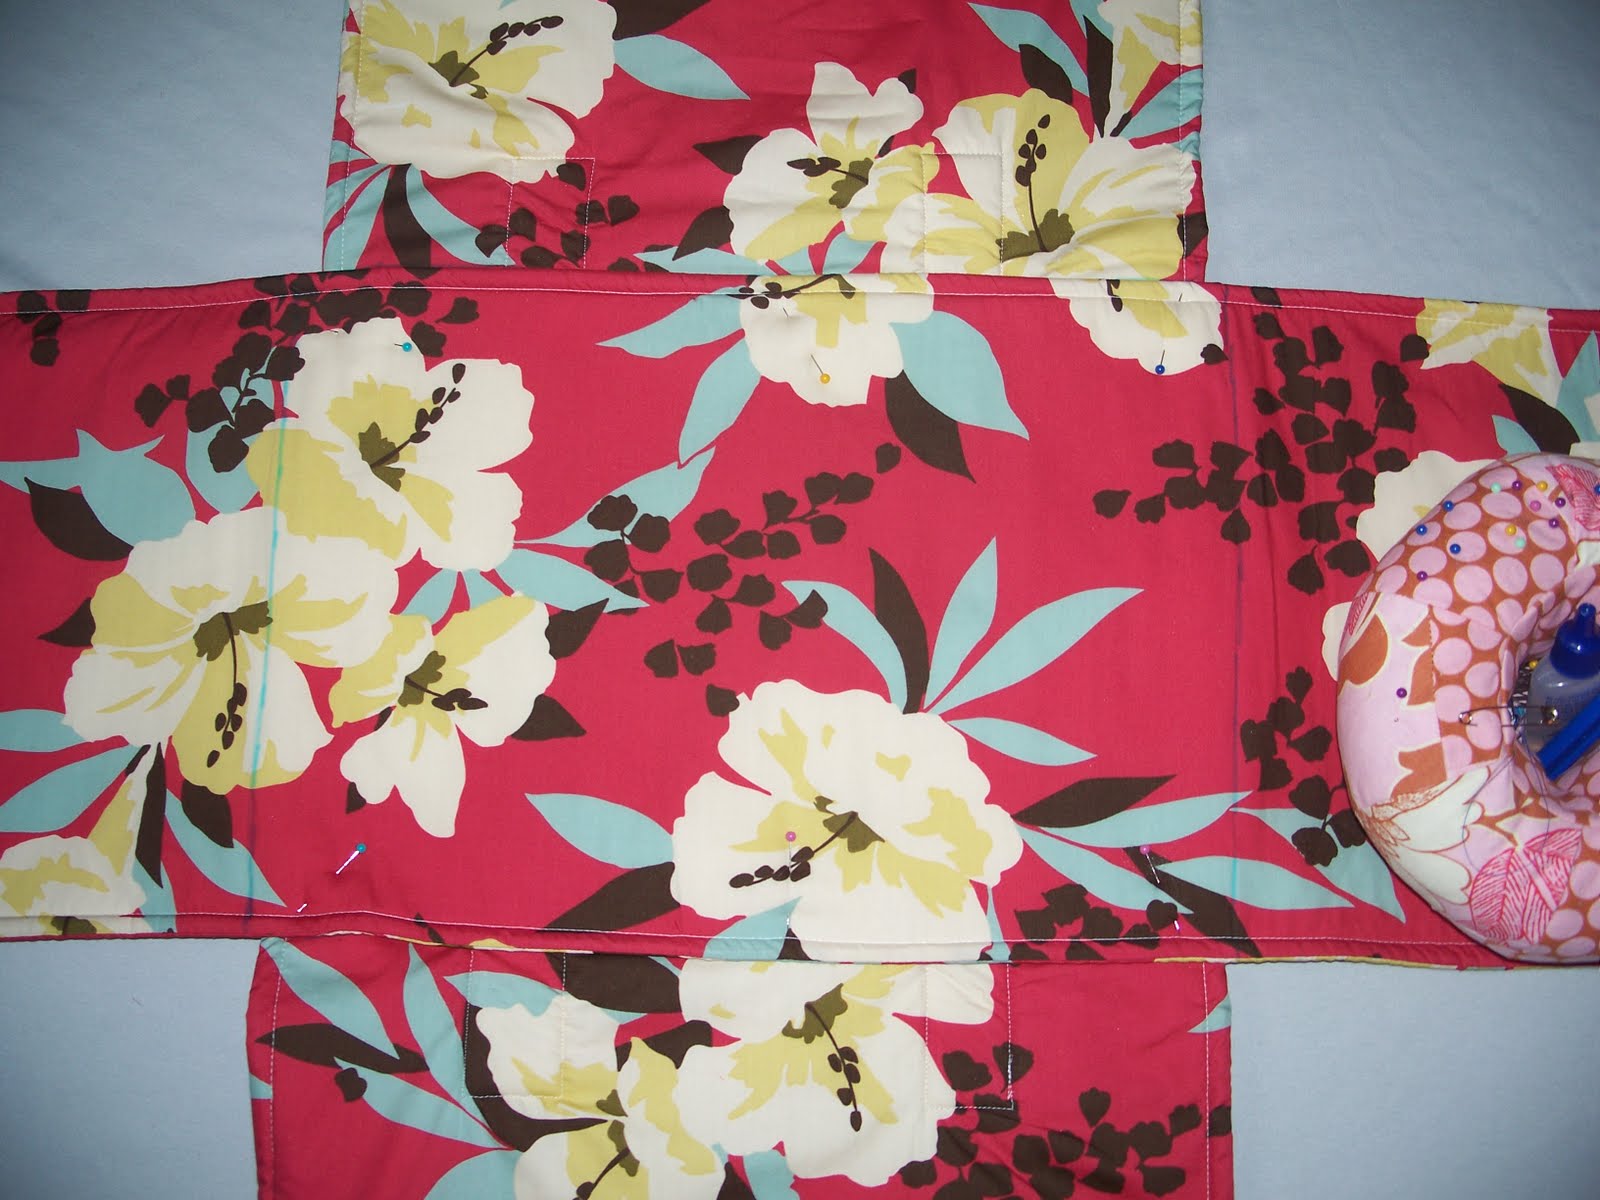 Do not sew directly on the marked lines. Sew in a little about. See where I made my stitches? Again, I wanted to make sure my stitches lined up with the stitches on the bottom piece. These stitches will be seen from the bottom. It will just make it look neater on the bottom of the carrier.
 This is what the bottom of the carrier looks like now.
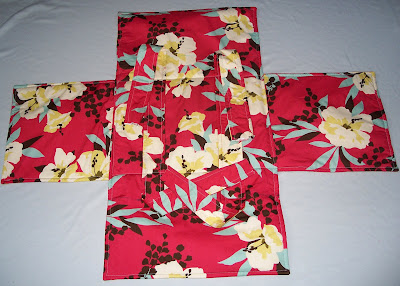 See how nicely the stitches line up on the bottom?
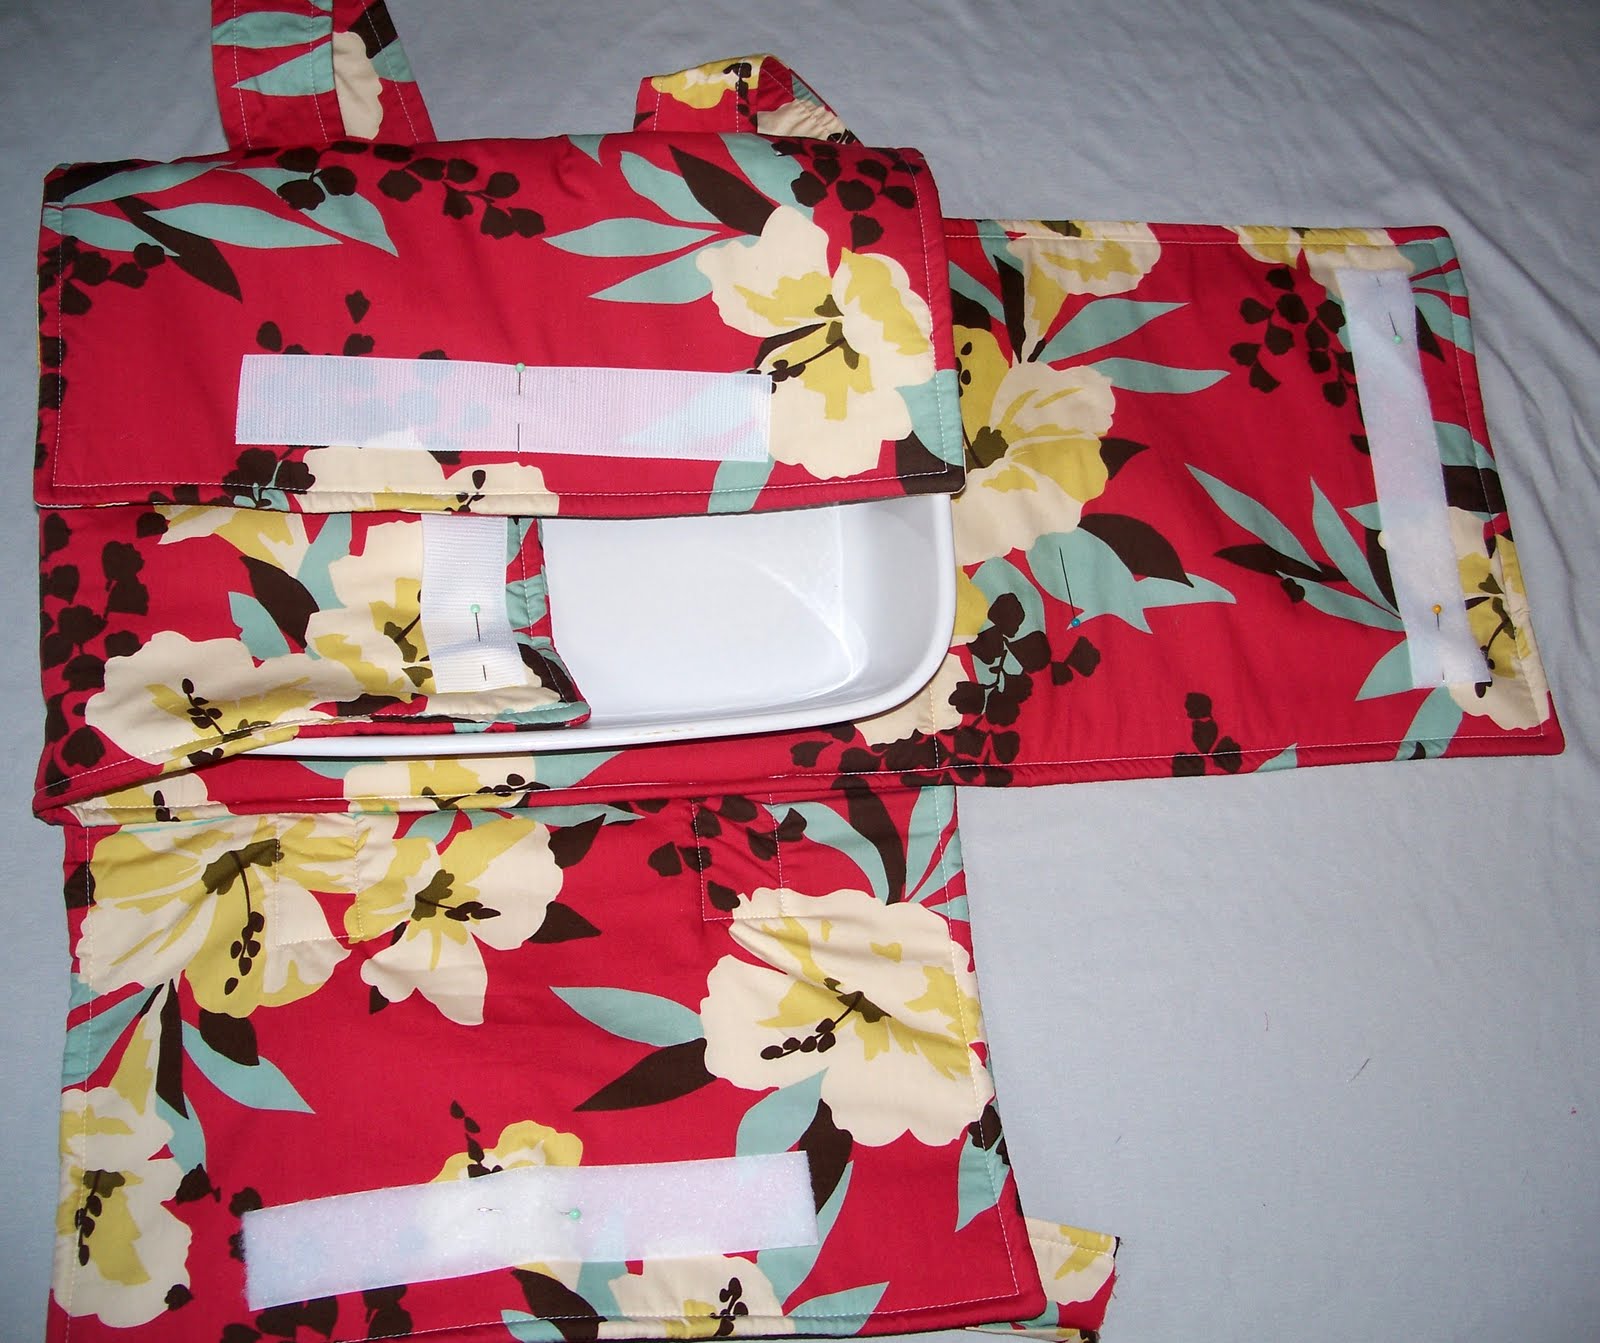
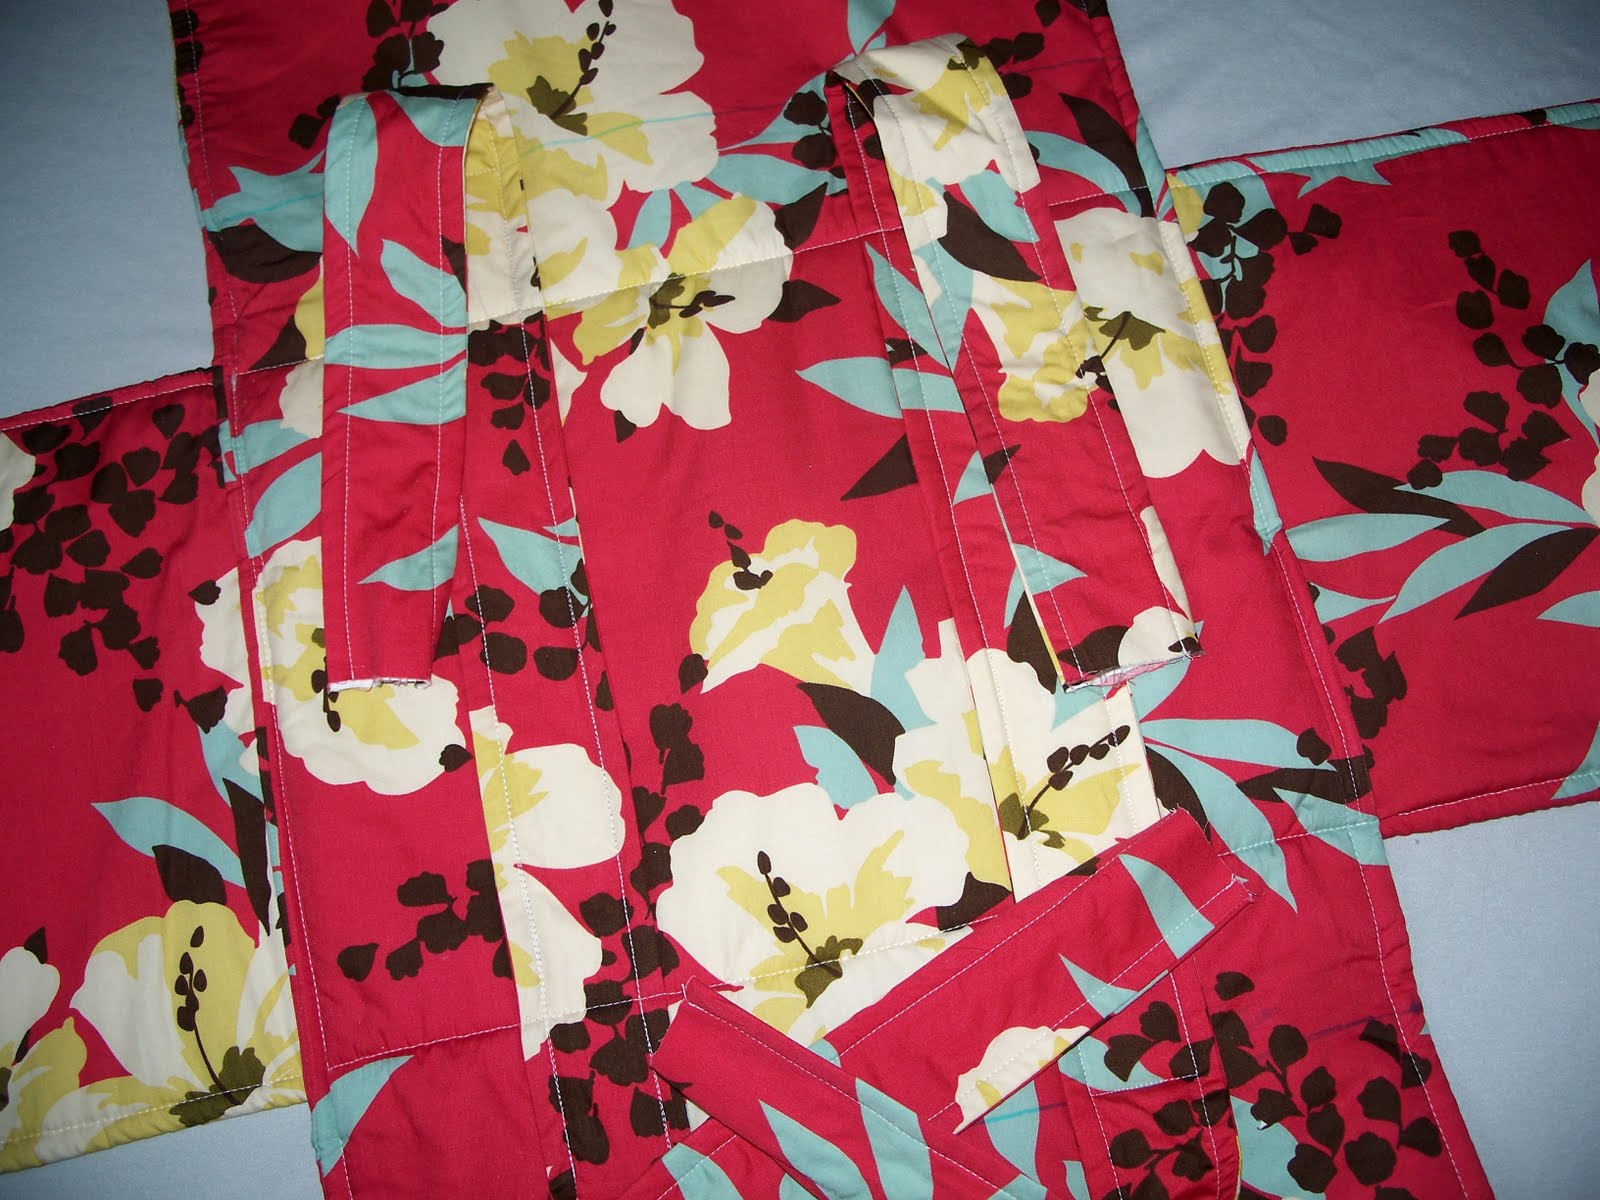 Time to attach the Velcro. Lay carrier flat, place casserole dish inside and pin Velcro in place where you want it.
Play with the pieces and see where you would like them most. Here is where I placed mine. I placed it in about 2″ from the edge. I used a 2″ wide Velcro so that I can use this carrier for two sized pans.
 Time to finish the handles. I prefer to make little padded sections to attach the handles together.
 To make the padded handles, cut four pieces of fabric and flannel (or batting) 6 1/2″ X 3″
 Layer them like so, with 1 piece of flannel, 2 pieces of fabric right sides facing, and the last piece of flannel on top.
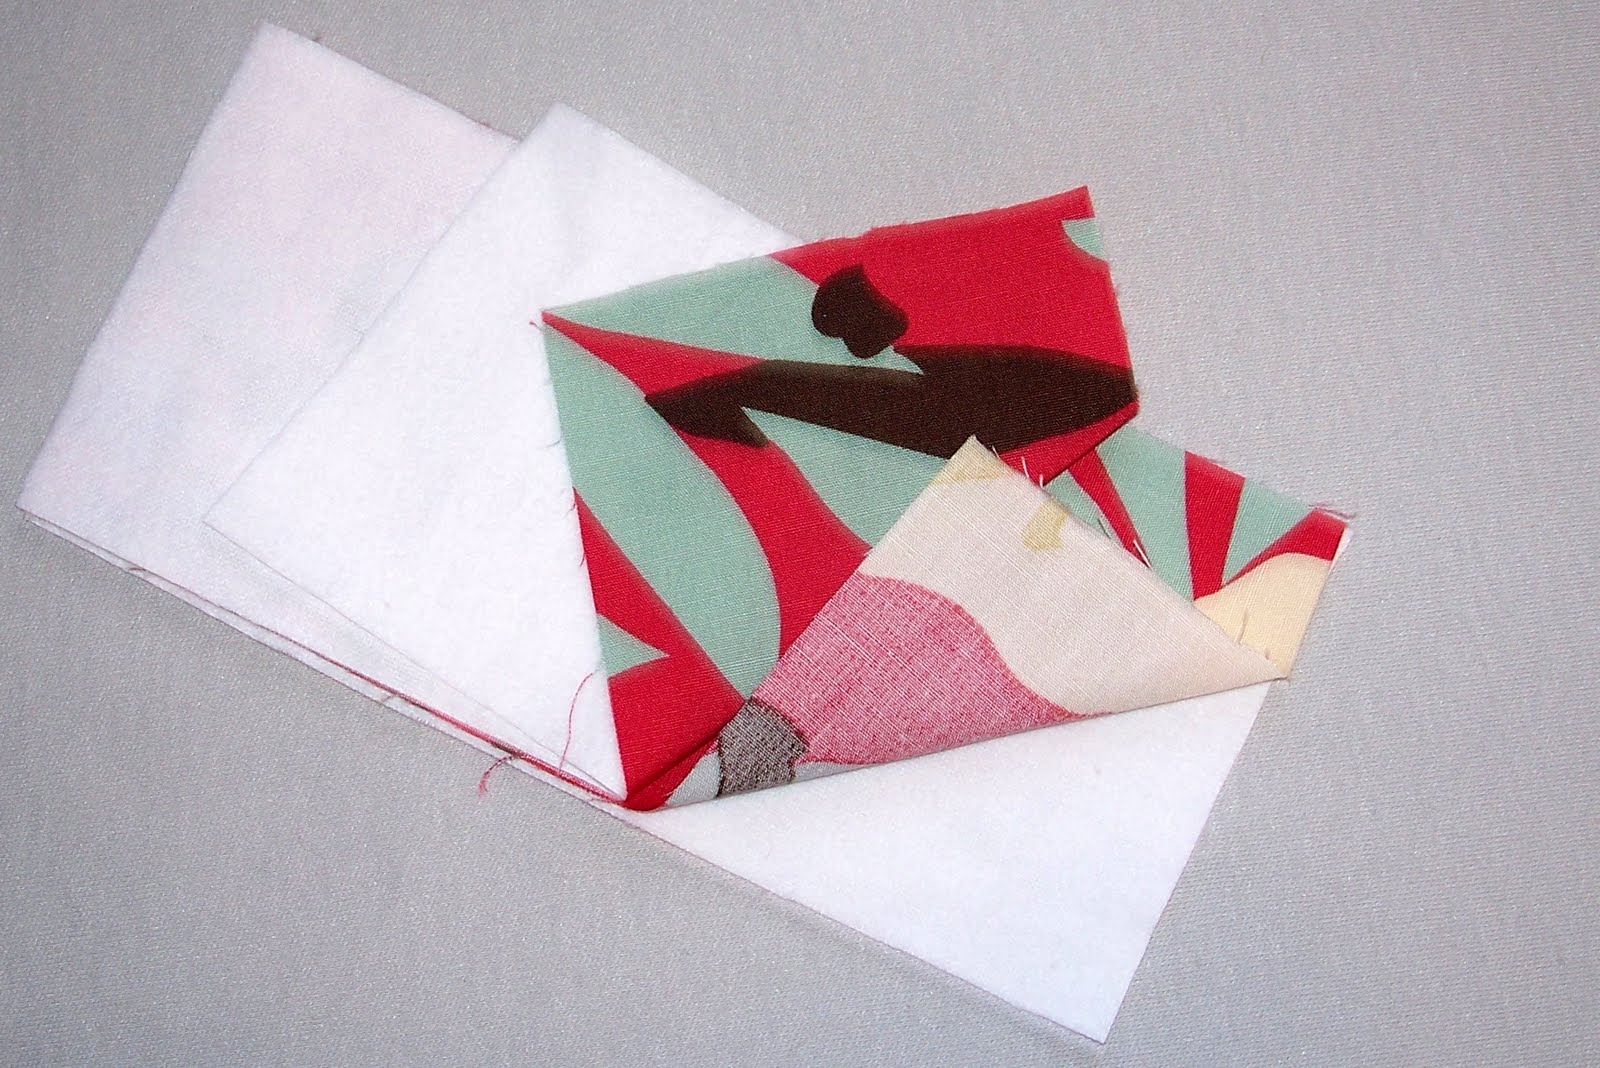 Sew sides together, leaving ends open.
Turn right right side out and iron. Fold ends in about 1/2″ and iron again.
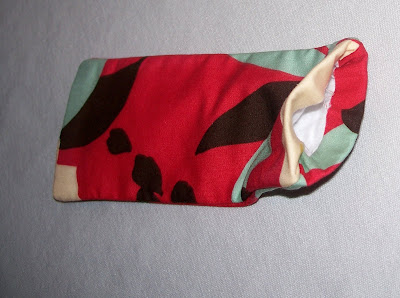
 Slide ends of handles into the middle of the padded handle. Make sure the handles are evenly lined up. You don’t want a lop sided carrier!
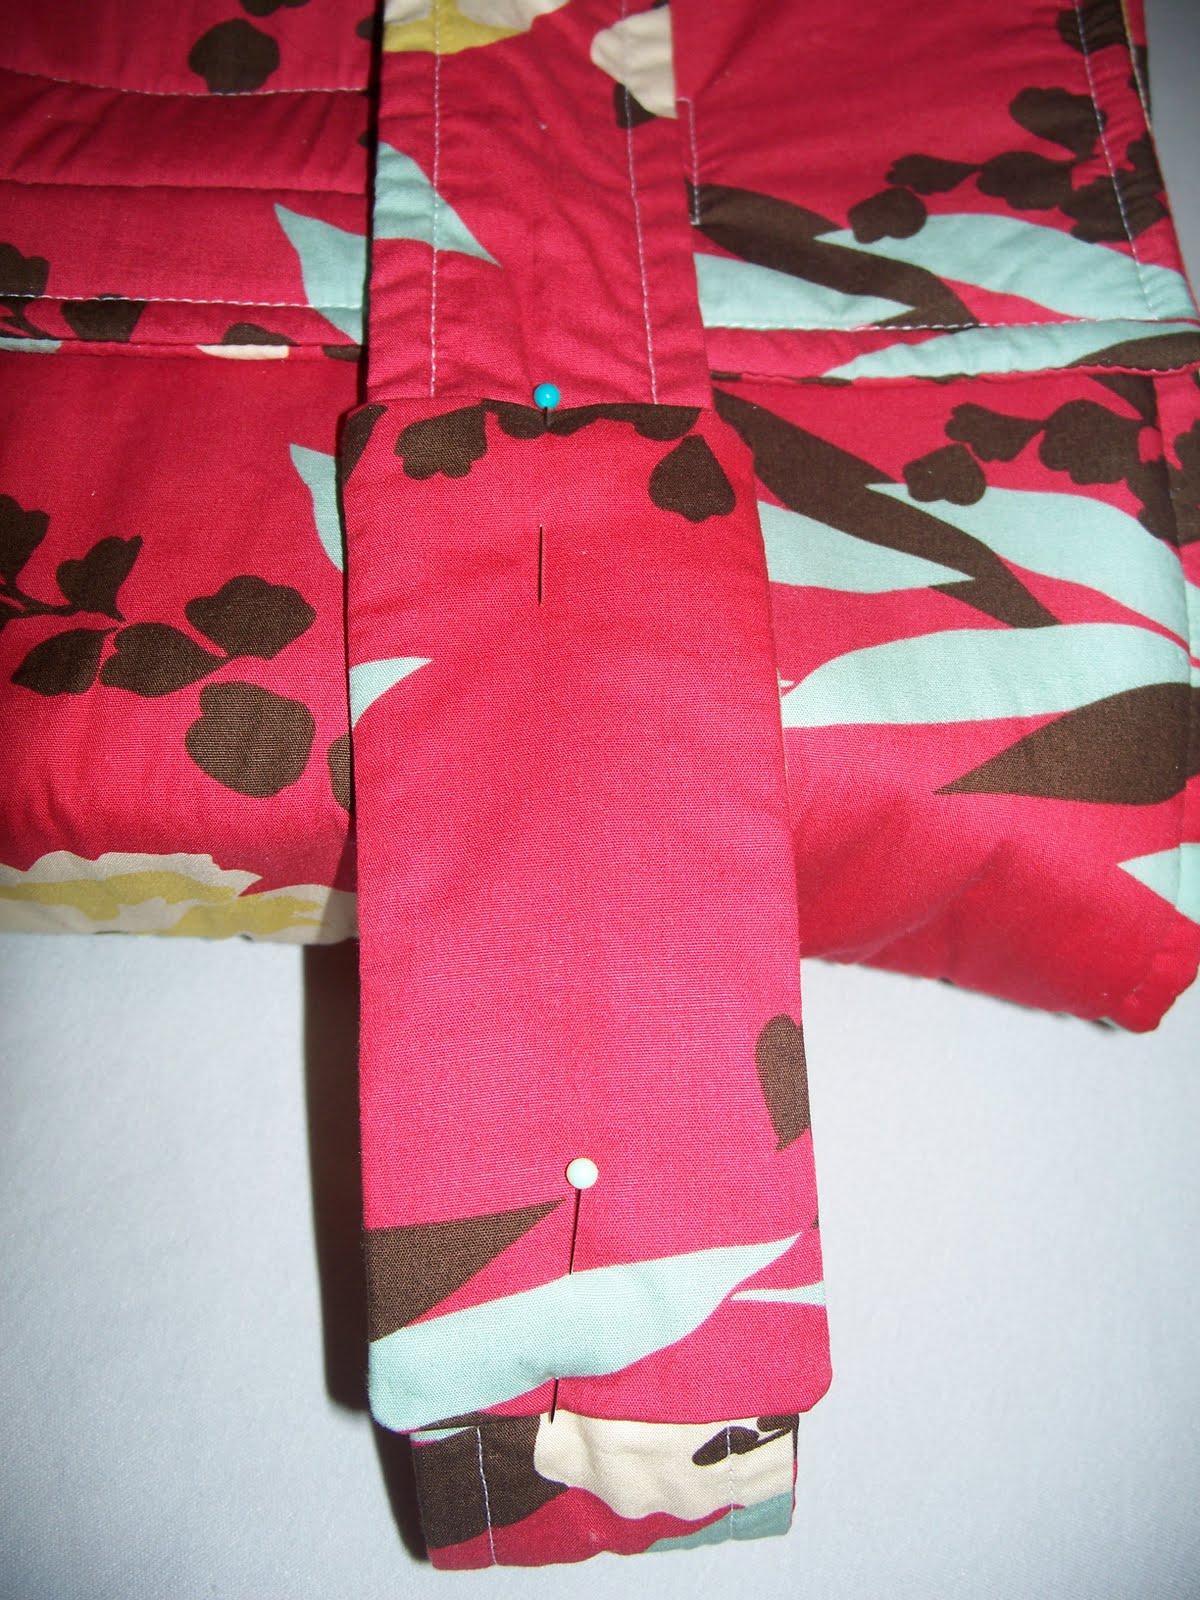 Pin and sew in place on the ends of padded handle.
The fabrics are pretty thick at this point and I had a hard time sewing through all the layers until I switched needles. I can’t remember the last time I changed my needle, it’s actually kinda embarassing.
 Cut two pieces of fabric 5″X 2″
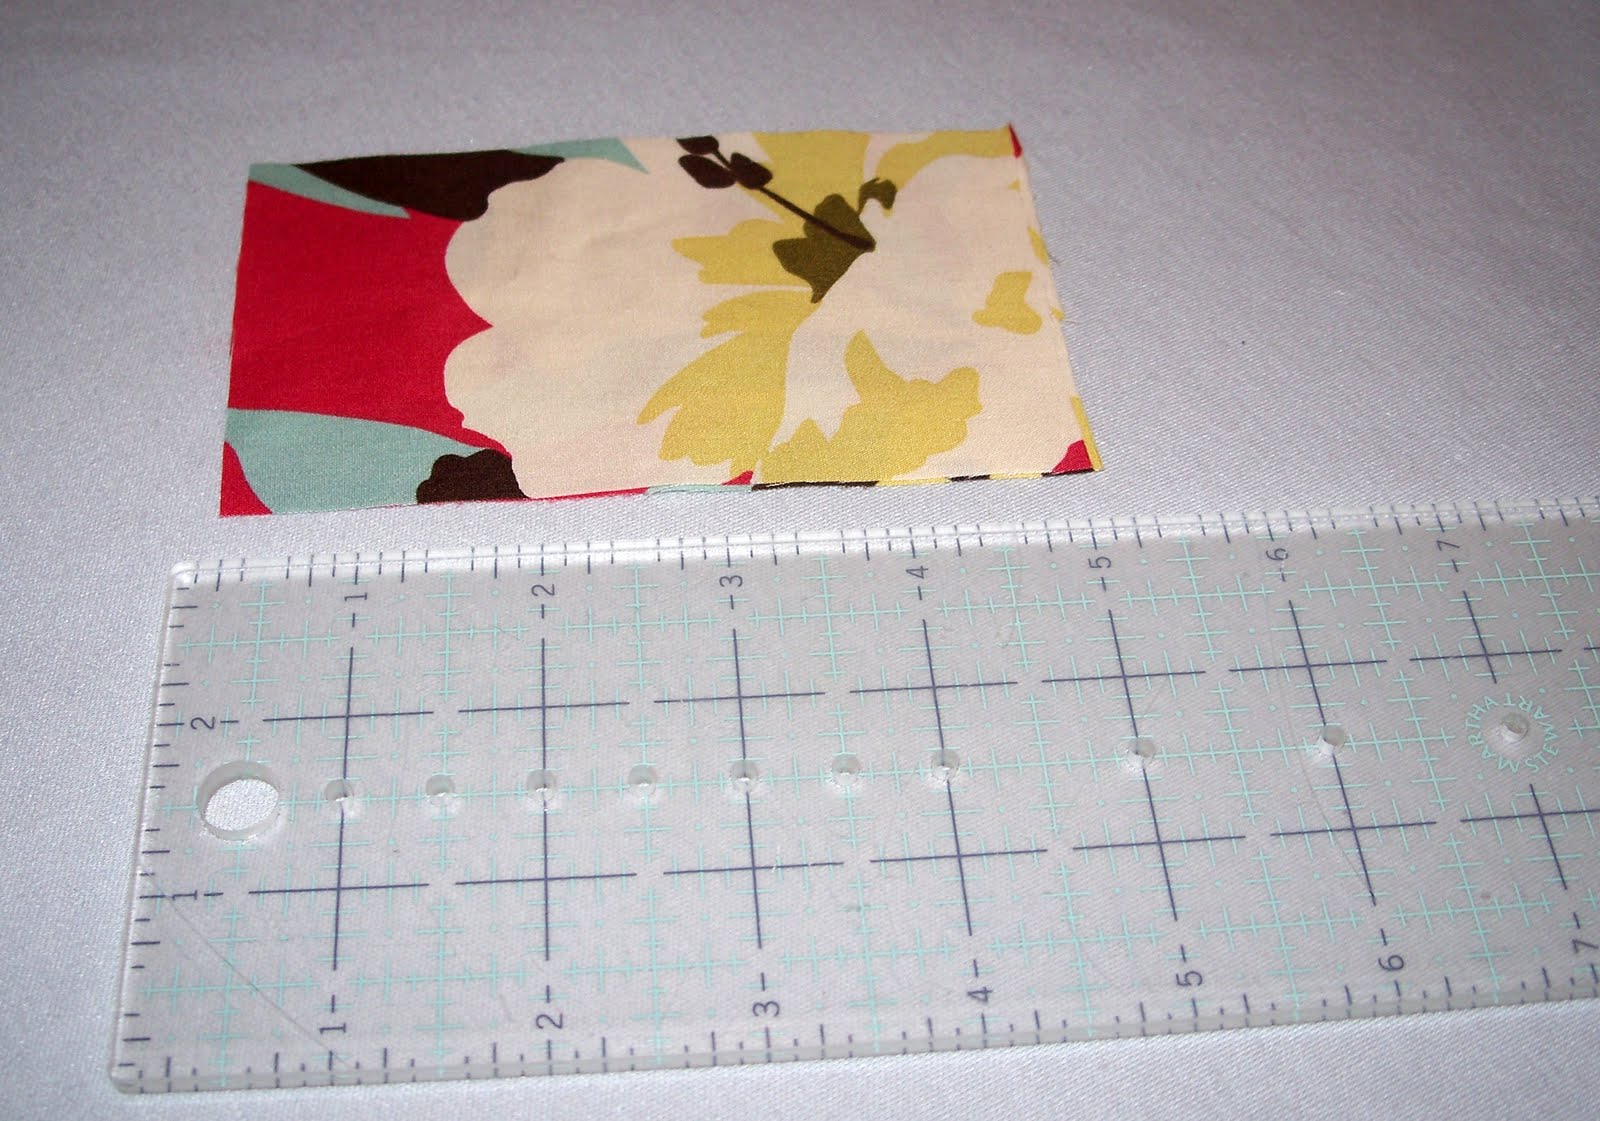 Sew together the two pieces of fabric, right sides facing. Leave a 1 1/2″ opening for turning right side out.
Turn right side out through opening, iron and top stitch.
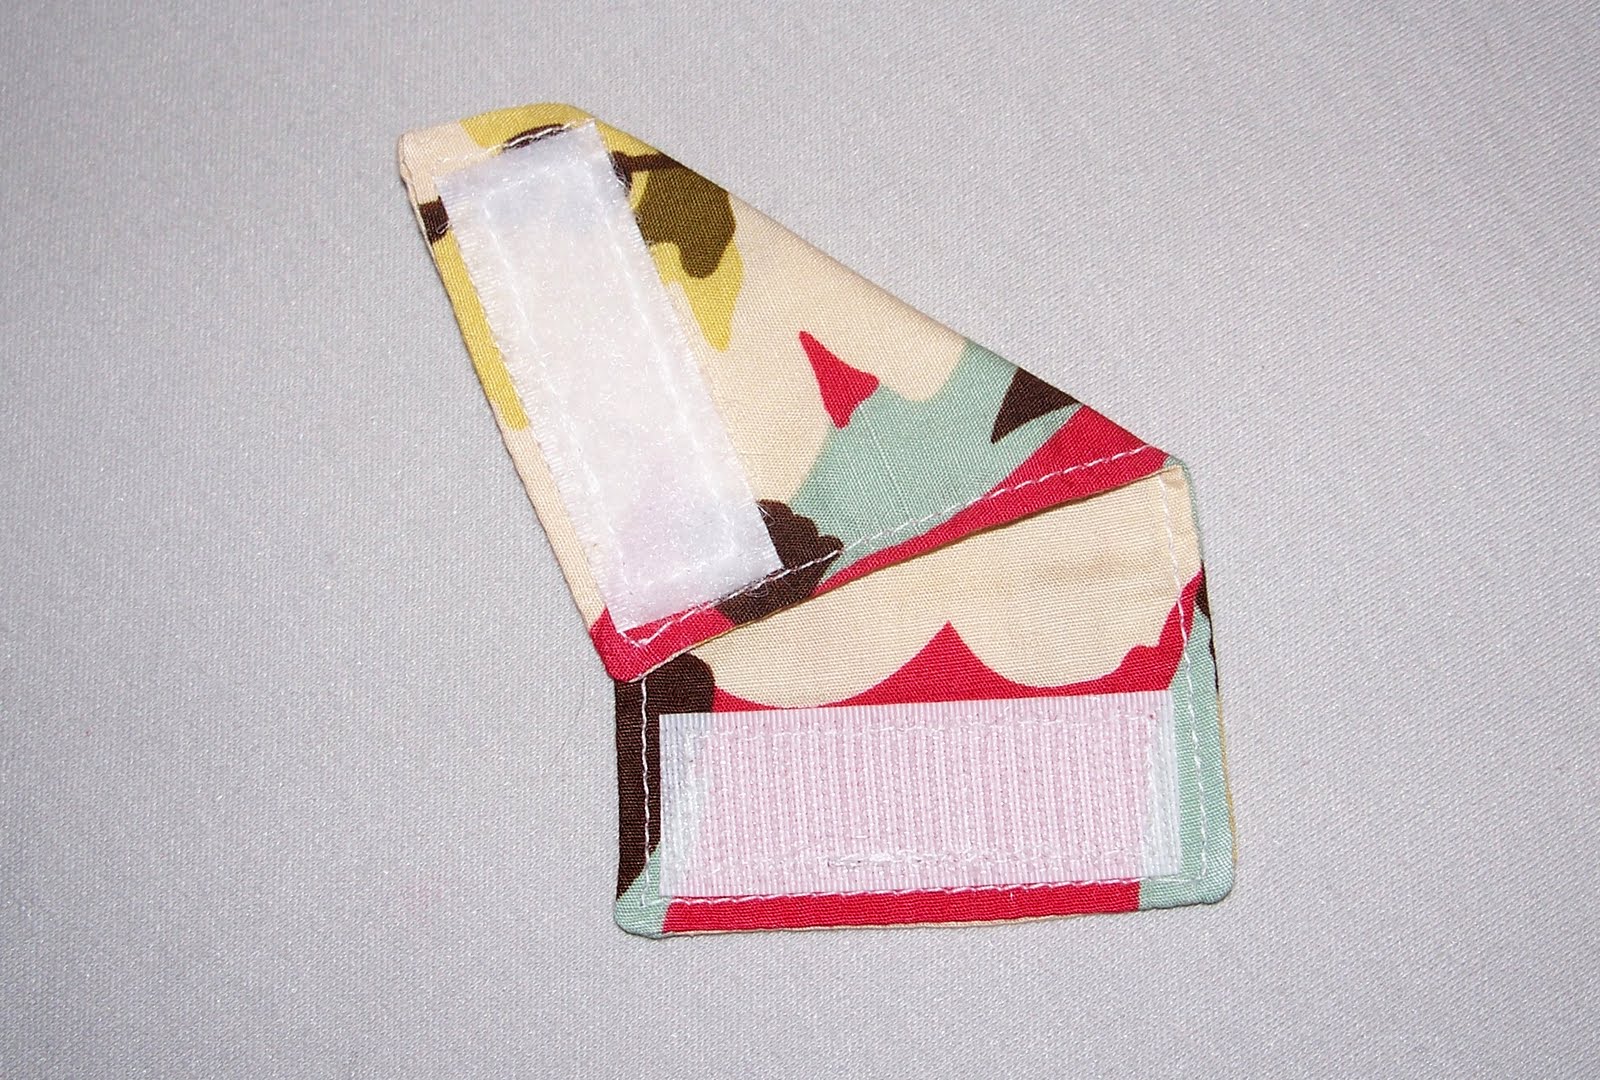 Sew the Velcro on. Make sure the Velcro is sewn on opposite sides and ends like in the picture above. The hook on the bottom front and the loop on the top back of piece of fabric.
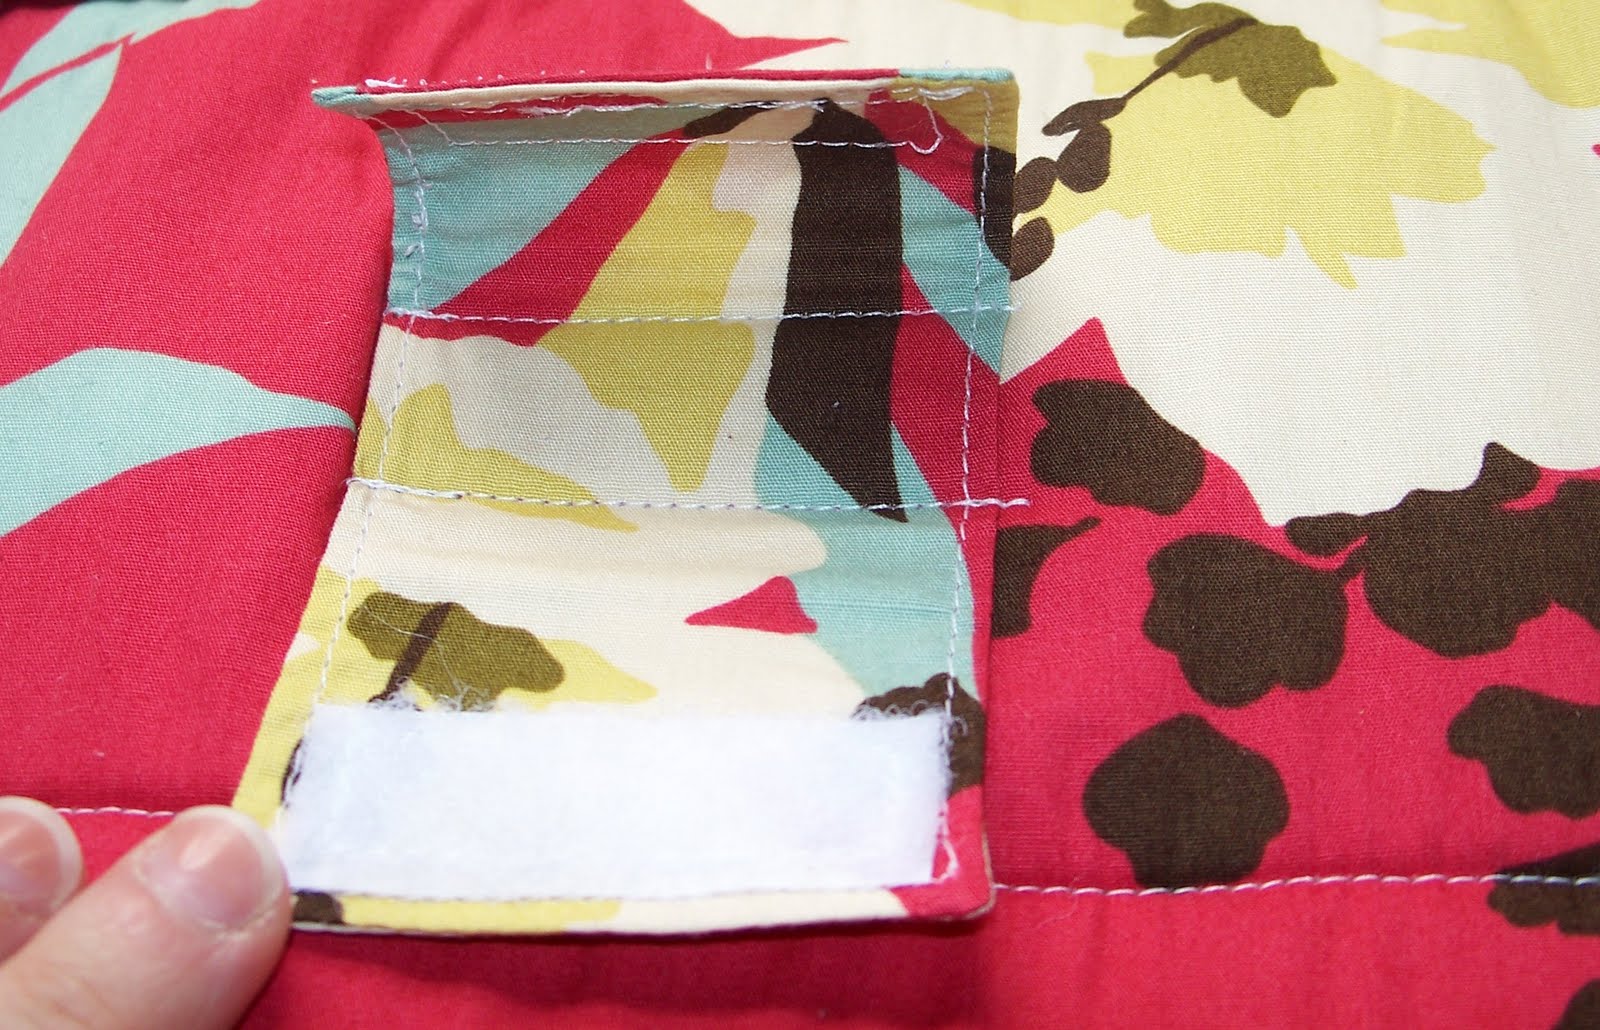 Fold spoon holder in half and mark where the center is. Now measure 1/2″ away from the center on the right and left sides. These marks will be where you want to sew the spoon holder onto the carrier. This way it will keep the spoon from wobbling too much.
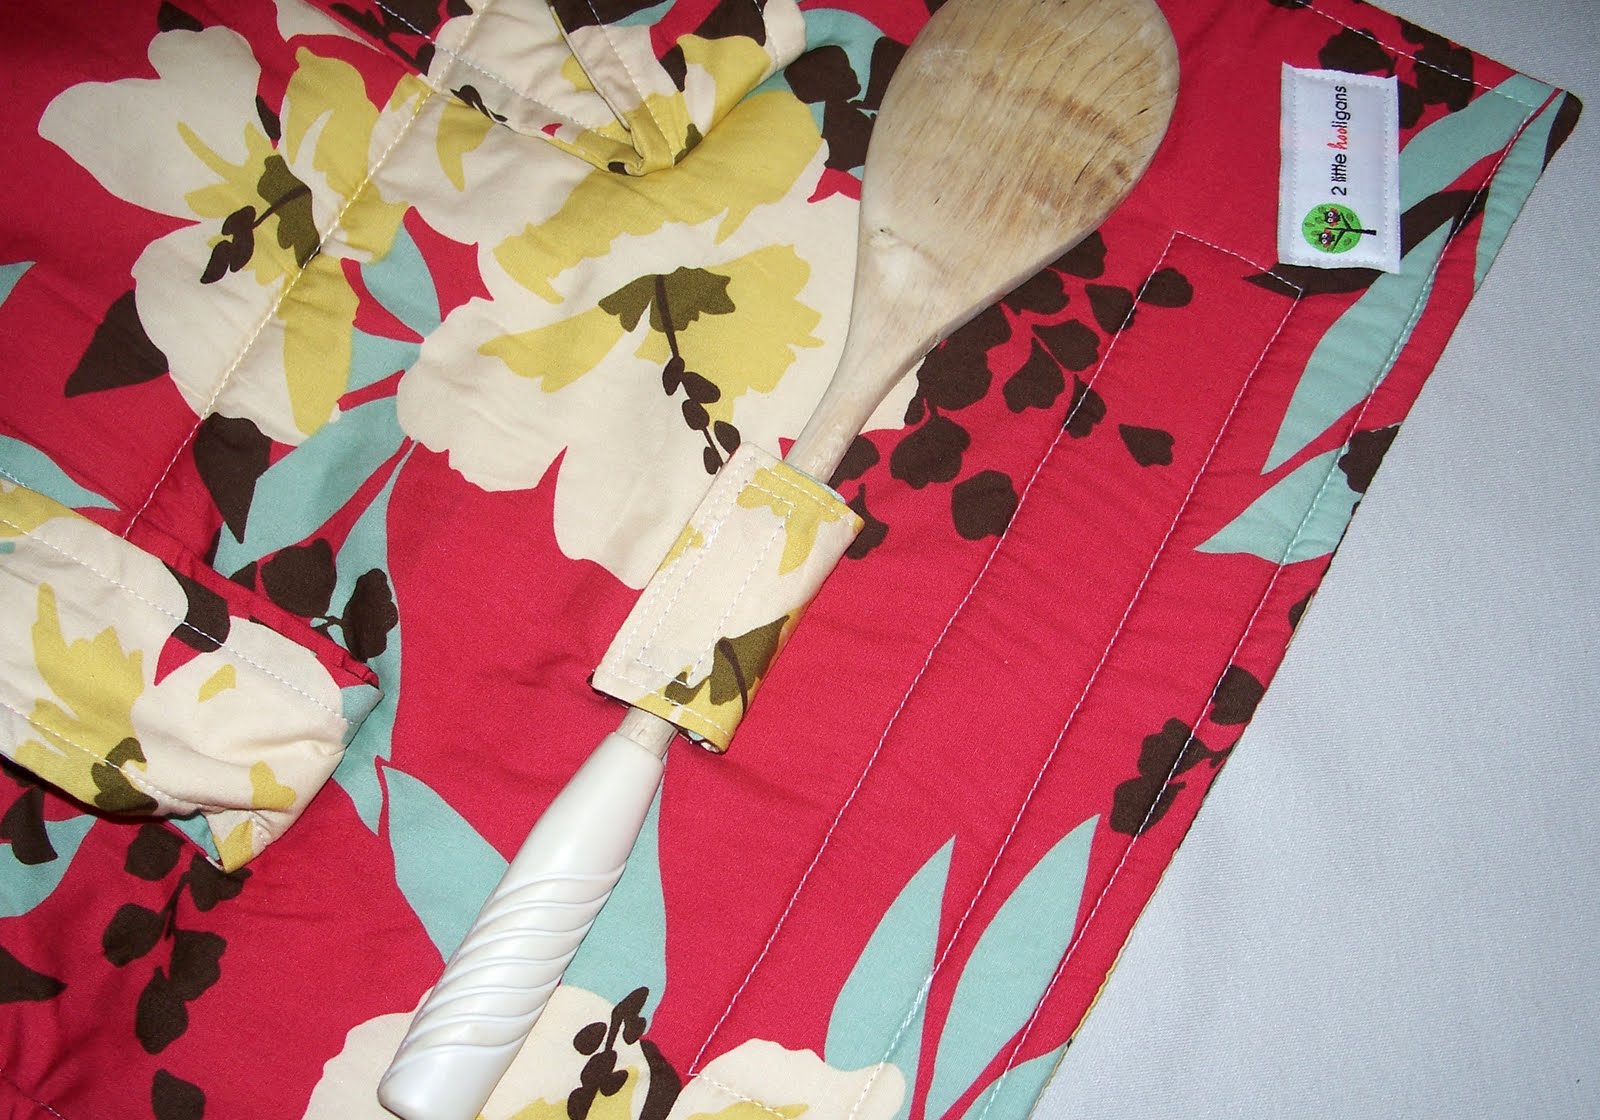
You are finished!
**This tutorial is for personal use only! If you are going to link up and use my pictures, please link back to this post and don’t forget to give credit where credit is due! **

I hope you will find some time to sew one up. I would say it takes about 3-4 hours from start to finish to make one of these. You will have a little extra fabric and Insul-Bright left over, so sew up some matching hot pads or oven mitts to go along with the carrier. If you make one using this tutorial, please email me a picture or add it to my flickr group, I would love to see it.
Tutorial updated: January 5, 2011

Thank you sooooo much. I LOVE this carrier!!! How much material (cotton) would you say to buy…1 yards, 1 1/2 yards or more? I can't wait to make this for myself:)
Tessa
ww**********@ya***.com
" rel="nofollow">http://
ww**********@ya***.com
according to the directions above
*medium or light weight cotton fabric (2 yards of fabric)
HTH.
I love this! I have been searching for a pattern or tutorial for this style of casserole carrier but all I can find is round ones or versions that use dowels. I am bookmarking this right now for not-too-distant-future use!
Rochelle @ http://homesweethomebodies.blogspot.com
Hooray for casserole carriers!!! Love this idea! I can't wait to find time to make one 🙂
GORGEOUS annnnnnnnnnd THANK YOU!
I'm making one this weekend! I'll send you pics. 🙂
Cheers!
Erin
THANX FOR THE TUTORIAL!!!!!!
I am gonna make some as a present! i love these cuties!!!!!
I am in love with this project! I have a boring navy generic casserole carrier BUT this one will be the talk of the next church get together! Now I need to find the time to make one!
This is great thank for the tutorial i am sure my mum and MIL would love one of these!
I would love it if you linked this up to Sew Crafty Saturday over at Sew Chic and Unique!
Mayya @ Sew Chic and Unique
I love this!
How clever! love this~
love love love this! I may make this for my mom and grandmother for Christmas. I am totally doing a handmade Christmas and I have been trying to come up with something for them!! Oh & if you have time I'd love for you to come link up to Handmade Tuesdays @ Ladybug Blessings next Tuesday! http://www.ladybug-blessings.com
how cute is this? thanks for sharing a tutorial!
I love this idea! I'm definitely going to have to make a few of these for Christmas presents! And the fabric you used is so cute! Love it!
Visiting from Crazy Domestic!
About twice a year I wish I had one of these, but I've never seen a pattern I like–until yours! This is fabulous! Thanks!
~mandy
Great tutorial. I like that you added a place for the spoon.
Love it! hope to try this. thanks for awesome tutorial!
I have been dying to make this since you posted your original a while back. Thank you so much for taking the time to make such and excellent tutorial.
I made one and love it!!!!
http://www.flickr.com/photos/72406419@N00/5170966322/
i absolutely love this! I would like to feature it on my blog smallfineprint.blogspot.com
If that is ok, please email me at
sm************@gm***.com
I've got a new blog and your carrier is my first feature! I'd love for you to stop by and grab a button! todaystoptwenty.blogspot.com
Can you please clarify what you meant by "**note: I changed the foot on my machine to H. It is one of the plastic feet. This made a huge difference.**? Maybe post a picture of that foot? I am very excited to try this project but I am a newbie at sewing and I am not sure exactly what you mean…
Thanks!
Hi Erica, When I purchased my machine it came with a few different types of feet in the storage compartment. The foot is a cream colored plastic and is labeled H. It slides nicely over the fabric because it has a very smooth bottom.
http://www.sewingstyle.com/viewproduct1609.html
Here is a picture of what it looks like. You can make one without changing feet, but I found that the insul-bright got caught on my usual metal foot. Hope this helps clarify it more for you. Let me know if you have anymore questions!! Thanks!
wonderful – that makes perfect sense. Thank you. I don't have a teflon foot like that – I do have a clear plastic foot that is the same shape – but I will try it with the metal foot first because it feels smoother than the plastic one.
One other question that occurred to me after I hit submit last night… You say "I had a hard time sewing through all the layers until I switched needles." – As in switched to a heavier duty needle (like a denim/leather #16 needle) or switched to a sharp new regular #14 needle?
Sorry if these are obvious questions – I am pretty much teaching myself to sew on my mom's 1970 era sewing machine and I don't want to screw it up.
Yes, I switched to a larger needle. Don't worry about asking questions. I am self taught and I'm still learning too!
Unfortunately the link you sent about the H foot no longer works and I have the same question. My machine came with a couple different feet but none of them are labled as “H” and since I’m new to sewing, I’m not so sure what to do.
Thanks!
Yay — this is just what I was looking for. This is only my 3rd project I have sewed by myself, but your tutorial made it easy. Mine is not as tidy as your carrier, but I am still pretty excited. Hopefully when I try to make my SIL another one for Xmas I will work out all my newbie bugs. Thanks!!!
Thanks again for another GREAT tutorial. I just made this last week to give as a wedding shower gift. It was quick and easy to make, loved it!
http://nicholleandherboys.blogspot.com/2010/11/time.html
I love this! I've always wanted a carrier but never wanted to buy one….now I can make my own!
Thanks for the tuturial, I just finished making mine. The pictures you provided made it so easy, thinking of making a couple more and hey why not make myself one while I am at it. Will email you the pictures or you can find them at my site..
http://www.txlady2018.blogspot.com
Thanks again. I love it.
Just finished making one for a Christmas gift. Hope my sister-in-law loves it. I will post on my blog with links to you after she gets it! Thanks for the tutorial/pattern.
Here's a link to my finished casserole dish carrier. Thanks for the pattern.
http://keepingmycents.blogspot.com/2011/01/homemade-casserole-dish-carrier.html
I used your tutorial (finally!) to make several of these for Christmas! I really love how they turned out. I posted about it on my blog- linking to you of course!
http://homesweethomebodies.blogspot.com/2011/01/more-christmas-gifts-kitchen-edition.html
Thanks again for sharing!
-Rochelle
bellissimo e molto utile,complimenti
I made one and I love it! Thank you for the tutorial!!! I will be putting pictures of it on my blog soon if you would like to see it. I will put up a link to your tutorial for others to come check it out!
I'm here from Homemade By Jill!
I LOVE the carrier! I will be making these for bridal showers, Thank you so much!
I'm here from Homemade by Jill, too. What a fantastic tutorial. I made one in just a few hours and I've linked to your tutorial so my friends can make one too. See mine here
http://divaskychick.wordpress.com/2011/02/06/snowing-and-sewing-and-snot-oh-my/
I LOVE this tutorial!!! I made one for a shower this weekend!
http://livingmysweetlife.blogspot.com/2011/02/bridal-shower-gift.html
I love it so much I am making another one for a shower I am hosting in a month! Thank you for the easy fun tutorial!!
Hi!
I just made one using you tutorial.
I made some little changes on the handles.
I just love how it turned out! Thank you very much for the tutorial. I put your link on my blog.
http://passionfruitprincess.blogspot.com/
Thanks again!
Ana Paula
Thanks for such a great tutorial. I hope to try it out very soon. I posted about it today if you wanna stop by and take a look. Thanks~
Alisa
http://alisa-thesweetlife.blogspot.com/2011/02/to-do.html
I love this! I'll be using it to make numerous Mother's Day gifts this year!
Thanks for the tutorial! It was quite easy to make in the end once I got myself motivated. I've linked to your tutorial and pictures of mine are posted here:
http://colleen-made-it.blogspot.com/2011/03/casserole-carrier.html
Thanks for sharing – this was a cute (and relatively easy!) project!! I made two!
http://homeinthecountry.wordpress.com/2011/04/19/casserole-carrier/
Ok I have a question. I have been reading the tutorial and making it as I go along and I didn't read ahead to see what other sizes needed to be cut out of the fabric. I went ahead and cut the main pieces but when I got to the handles the length of the fabric left was only 36". Do you think even though it's 4" short that it will still work for the project? Thanks (next time I will read ahead and plan for it)
Katie
I know what mom is getting for Christmas now! 🙂 I'll buy a casserole dish to go inside of it and make some mitts and she'll be so happy!
Hi,Thanks so much for the pattern.The only trouble I had was figuring out how to attatch the handles.THen I got a good nights sleep, atr breakfast and it was much better. Carole
This is the second carrier I've tried making and I must say, I love this one a lot more. I still need to do handles (out of webbing) and I may add a button closure. I did a pieced design to include more fabrics to match my kitchen. I've linked you to my blog. Thank you for the great tutorial! http://thismomblog.com/2011/08/18/sewing-for-the-kitchen/
Thank you for this project. I would have liked the tutorial better if you had used a dark solid color fabric with the light thread.
i agree about the colour. I found it too difficul to see any stitching. any chance to do it again in plain fabric?
This is a great tutorial, thank you for sharing! I made three casserole totes for christmas presents, but I made some of the same changes as Homemade by Jill. http://homemadebyjill.blogspot.com/2011/01/insulated-casserole-carriers.html . I linked both of you. Thanks again!
I *love* your casserole carrier! I used the plan (modified slightly) to make christmas presents last year for my mom and aunt. And, time allowing, will make one this year for my new mother-in-law!
Thank you so very much!!
It's beautiful! Thanks so much for sharing.
I am currently making (trying to make 🙂 your carrier for my mother. My pieces seem to "wrap" the dish better if the shorter piece goes on top and the longer on bottom (the other way leaves gaps at the four corners). Do you think I can put it together that way and just change the straps accordingly? Or do you have another suggestion?
Thanks! (So excited about it!)
that definitely sounds like it will work. there is no wrong way to do it. just as long as the sides wrap around the dish and keep it in place. make sure you share the finished product with me:)
What a great tutorial! Thank you for sharing. Can't wait to make this and to gift a few!
I can't wait until after Christmas to make one of these. I wish I would have found this a couple months ago.I would have made several as Christmas presents. I can tell you now I will be giving these as gifts next year. Thank you so much for the tutorial. I have searched many sights and this is the one I am going with. I love it because as many of the others I am fairly new at sewing.
OMG, this is so AWESOME!! Thank you, I am going to make these for each of the women on my Christmas gift list for sure! I am "SEW" excited to get started tonight, I actually have all the materials needed too. My mom is a total purple freak so guess what color fabric I will use on the 1st one? I will also use your suggestion and make matching pot holders. Now, what to make for dad? Any suggestions? He's totally into golfing and he's a business man. IF I can figure out how to post photos onto the internet I will indeed. (I've recently switched to Windows7 & still haven't figured that out) I used to post pics all the time on XP, ut I just can't figure it out on 7. I will def try though. Thanks again, this great!!!
I just finished making one for an exchange gift at our Quilt Guild Christmas party. I used two fabrics – a kitten pattern with kitties tumbling in Christmas ribbon and for the inside /lining a bright red fabric with gold stars. I went out and bought more insul-bright to make four more. Yes, I know it's December 3rd but these are easy and once you make the first one, it's easier yet. Thank you for a wonderful idea. I am so pleased to be able to gift this to a fellow quilter.
Am I missing somthing. 🙁 You stated a yard for the insulbright. I did the mesurements of 37 and 30 but one yard is not enough unless I am just missing somthing. I am new to this, so I dont doubt it. Could you please send me a picture of how you would cut two peices out of one yard.
anonymous, not sure why your insul-birhgt is that size. this is what i use but i buy it by the yard at joanns:
http://www.fabric.com/ProductDetail.aspx?ProductID=6fb18085-4191-44c8-bb96-216e15376e16
their yard measures 36 x 45, but you still should have enough even if yours measures 37 x 30. one piece measures 30 x 15 and the other measures 37 x 12. you will be using the whole length with one and need to trim the other one. does this help?
I went to Hobby lobby to get mine. Maybe Hobby Lobby's does not mesure the same because it was way off. I will check again and mesure it this time. Thank you. I am guessing it was the size I purchased. Thank you again for your time.:)
I know what you mean. I bought the material for my first one at Joanns and it was enough insulbright, the second time at Hobby Lobby and when I went to make it today I was trying to figure out how I cut it last time to make it work. Yes, it seems that Hobby Lobby’s insulbright is not 45 inches wide like Joann’s. Lame. I’m glad I’m not the only one with this problem. I was seriously questioning my sewing abilities. Unfortunately, now I have to go back to the fabric store.
I had the same problem. I ended up cutting one piece 12″ wide and the other 10″ wide. I put it evenly in the middle of my sandwiched fabrics, then sewed 2 lines down the middle after I turned it to “quilt” it together. The insul bright is still completely under my dish, just not exactly how nicely the original should go together. But, I think it’ll still work!
I also monogrammed a name on the top piece to give as a wedding gift!
Thanks for the great tutorial!
Im gonna be monogramming all of mine too. Where did you put yours? Could you share a picture?
Just finished my third carrier! Only one more to go and each of the women on my Christmas list will get one of these fabulous casserole carriers. Thank you so much for the great tutorial. It's easy to follow and turns out a great finished product.
Thank you so much for this tutorial! I am currently making two for Christmas gifts. I was so excited to start that I went out and bought all the materials and started sewing before I bought casserole dishes. I would say to those of you just starting that I had a lot of trouble finding a lidded casserole dish that would fit this pattern. Pyrex's new lidded casserole dish that is 9×13 has these new easy grip handles that are really long, so the 37"x 12" piece didn't leave enough room to close it. For those of you who have already made and are using this, does your casserole dish have a lid and if not have you found it to be an issue??? Obviously you could use foil to cover your dish, but I was really hoping to find one that had a lid.
Also, I thought it would be fun to use etching cream to put the last name of the recipient on the glass casserole dish to add another fun touch and make it easy to have your casserole dish returned to you after a potluck.
Thanks again!!
Thank you. I got 3 of these made for my Granddaughters for Christmas. I found the Cupcake prints at JoAnns and they came out really cute…except I have to sit now and trim all my threads – family joke Mom always leaves threads when she sews. They should be really handy since there are so many "family" get togethers anymore now they are all married
thank you so much!
SO happy to have found this! I can't tell you how many times I've packed dishes on trays and in boxes and made multiple trips to and from the car for just one little event! These will come in handy – can't wait to get started!!
Thank you so much for sharing!
Thanks for the tutorial! I'm a newbie to sewing but managed to get through this project without much trouble … I'm sure my next carrier won't take as long, haha, and may have a few straighter lines but overall I'm quite impressed! Thanks for the step-by-step pictures; those were a HUGE help!
This carrier is so cute! I'm participating in a "Pay it Forward" project on facebook and looking for ideas as surprises for my 5 people…they expect a quilt wall hanging or something like that, this will not be what they expect! I'll try to remember to take a pic and send you link if I make this one…been looking at a few options, but I really like yours alot!!! Thanks for taking the time to make such a detailed instruction tutorial!
Love this!! I just pinned it to pinterest and it's already been repinned a ton! I am new to sewing and can't wait to try this out. I also love the toddler bracelet, which I also pinned and it's being repinned a ton too!
Thanks so much for this great tutorial!! I followed the advice of Jill (http://homemadebyjill.blogspot.com/2011/01/insulated-casserole-carriers.html) and made the 37inch piece 40 inches instead, and did different materials for the outside and inside. And then I followed my mom's suggestion of putting 4 inch long strips of velcro vertical along the sides instead of horizontal, so that I could adjust it for every casserole dish I use it for.
You can see pictures of the one I made here – http://www.facebook.com/media/set/?set=a.515554538547.2008369.113600076&type=1&l=73724c72b8.
This was my first real sewing project (that I actually finished) – thanks for the step-by-step instructions. It made it so easy to follow! I love it and can't wait to use it! I also bought another fabric for the outside of a 2nd one which I can't wait to get started on!
This is an awesome tutorial. I can't wait to make this. The only problem is that my computer is not near my sewing machine and to print it out from the website takes many many pages. Can you tell me how to be able to print it so that it only prints the pattern and not all of the other stuff on the page. Thank you.
Hi there, just became aware of your blog through Google, and found that it's truly informative. I am going to watch out for brussels. I will be grateful if you continue this in future. Many people will be benefited from your writing. Cheers!
Granite Quick Check indicator Stand
Do you have any tips for turning the handles right side out? I've spent about 45 minutes so far and they are still not turned right side out 🙁
YOU CAN MAKE YOUR HANDLES WITHOUT TURNING TAKE A PIECE OF FABRIC 5 INCHES BY LENGTH OF HANDLE.
FOLD IT IN HALF ND PLACE YOUR BATTING ALONG SEAM ON WRONG SIDE OF FABRIC. FOLD IN TWO RAW EDGES TO MEET IN CENTER, SANDWICJING THE BATTING . SEW A SEAM 1/4 INCH FROM EDGE AL ALONG AND THEN AGAIN ON THE FOLDED EDGE SO IT LOOKS THE SAME.
tj, i usually use a diaper or safety pin and pin it to one of the ends on one edge. then pull the pin all the way through the casing. hope that helps:)
Hi – I just finished the casserole carrier from your tute, and it came out so nice! Thanks for all the great pics and step-by-step instructions.
Thank you for such a great tutorial. I made two of them – one for a 9 x 13 and one for a taller square casserole dish and they both turned out great. I made them for a friend who goes to a monthly recipe club and she was so excited to get these. They were a fun project – thanks again!
This inaiomftron is off the hizool!
Thank you for sharing your instructions! I made one for a friend as a birthday gift, with some changes suggested by another blogger and used elastic as a utensil strap instead of fabric: http://www.ushadesigns.com/2012/03/finding-ideas-on-web.html
Very pretty carrier!
Hi! I just stumbled upon this tutorial via pinterest and I love it! Do you happen to sell these online? Etsy? I am not one to sew nor do I own a sewing machine. Please let me know! I have a wedding coming up and this would be perfect for the bride!
Thanks,
Cortney
sorry, i am not selling any right now.
I’m a bit sad, I went and bought the Insul-bright at 1 yard for $7.99 thinking that this was the amount i needed and then i went to cut to your specification and realised that it’s nowhere near the right amount. I actually bought extra to make sure and it’s way to narrow to cut the both pieces out 🙁
I”m only new to this, does the insul bright come in two sizes? perhaps you should specify this in the pattern? I probably should have added the two pieces before i went to the shops but now i’ve wasted money, i would have bought the exact right size for each had i known or at least closest to it.
Make sure that it is 44 wide as yes it come narrower.
Thank you so much!! My mom is a great quilter. Does magnificent work. I think I may try to make one of these for her and my sisters. Thanks again!!
Jackie
Definitely believe that which you said. Your favorite reason seemed to be on the web the simplest thing to be aware of. I say to you, I definitely get annoyed while people consider worries that they just do not know about. You managed to hit the nail upon the top as well as defined out the whole thing without having side effect , people can take a signal. Will probably be back to get more. Thanks
appreciate the effort you put into obtaining us this info 843934
What i do not realize is in reality how you are no longer actually a lot more smartly-appreciated than you may be right now. You’re so intelligent. You recognize thus significantly in relation to this topic, made me in my opinion imagine it from numerous various angles. Its like women and men are not interested until it’s one thing to do with Lady gaga! Your own stuffs nice. Always deal with it up!
Ck9ryE Looking forward to reading more. Great article post.Thanks Again. Much obliged.
THANKS so much for this tutorial! Your instructions & pictures are so helpful & clear. I had no problem making this casserole cover. I made one for my mom for Christmas & she loves it! I’m definately making more of these for gifts! Thanks again. I actually posted the one I made on Pinterest & have a link to your site.
What a great tutorial! I have always wanted to make one of these and now I will!
I just made this for my sister’s birthday gift! It worked out great, but I did make it a bit bigger in all directions to accommodate a dish with handles. I also used grosgrain ribbon for handles instead of cloth. But I love the result! I will eventually make myself one also.
okay, I know I’m missing something. I laid out my insulbright to cut it and no matter how I configure it there isn’t enough fabric! i even measured to make sure they gave me a full yard at the fabric store. What I don’t understand is that you say to cut one of the pieces 37″x12″ and there are only 36″ in a yard! What am I missing here? I know there’s probably some simple answer that will make me look stupid, but it’s driving me nuts!
Thank you! I was wondering the same thing. I bought mine on eBay though so I thought they somehow didn’t give me enough. I’m following Homemade by Jill’s suggestion of making the 37″ piece 40″ to accommodate for the handles on the dish, so that messes up the amount even more. I really don’t want to buy more of it but it looks like I’ll have to.
It comes in 2 widths 36 and 44.
I found this through Pinterest via TaylorMade and I love it! Thank you so much for sharing the tutorial with us!
Like Nicky, I found you through Pinterest but it took five sites to get to you. I think I’m going to repin you to make it easier for other pinners. This is super clever and believe it or not I’m making it for my son who has become quite the cook. He and his girlfriend are always bringing something somewhere and he’s complained about how messy it can get. Thanks to you, problem solved! I think mine will be a bit more manly looking but I’ll be glad to send a pic.
Thanks for posting this!
Amazing!!! What a wonderful idea! I have 2 questions… Do you think this would be too difficult for a beginer? It would be my first sewing project… Second, about how much does it cost for all of the materials to make this? I’m so happy I found your site… So cute!
I just made this tonight for the first time. I have sewn a few basic things in my life, but I would definitely be a beginner still. I did this in 3 hours, with modifications suggested by “homemade by jill.” I had my mom (an expert sewer) by my side in case I was confused. For me, the instructions needed a little more detail that a beginner may not think of…like how far in do you sew? How much is “a little bigger than insul bright”? It cost me $18 for all the supplies needed. Not sure if that’s helpful, but I say give it a try!
A friend of ours made one of these for my birthday. She added a terry cloth lining on top of the insul-brite. This way I can just set the casserole in the carrier without waiting for it to cool.
I LOVE this thing! And now I know how to make more for myself!
Thank you!
What’s Taking place i’m new to this, I stumbled upon this I’ve found It positively helpful and it has helped me out loads. I hope to contribute & help other users like its helped me. Good job.
been looking for a nice pattern for one ofhanks these t
Great blog man, i dont read blogs any more but this is really usefull.
Hi! Nice tutorial! Flckr link seems broken.
Thank you! Easiest one I have seen. Can’t wait to make it. Good job!!
I am in the process of making 3 of these for some relatives. I can’t wait, they look SOOO cool! However, because I am making 3, I am finding that I will have a lot of scrap insul-bright. I know I could make pot holders or other things with them, but I would just rather not have the leftover if possible. I am wondering if it is possible to connect two pieces of insulbright? I have never really used it before, so I’m not sure what connecting two pieces would do to it’s effectiveness. I wasn’t going to lay them over one another, but next to each other so that there wouldn’t be a bump. Ay idea if this would work?
I love these casserole carriers, I figured out the measurements for a pattern myself so I don’t have to keep referring to your site. I had quite a few requests and put them on sale at Etsy! (BlissQuilts)
how much would you say this costs altogether?
Bummer! I, too, got my Insulbrite at Hobby Lobby and don’t have enough to start my project now 🙁 guess I will go to Joann’s tomorrow! Might want to edit the tutorial to let people know 1 yd from Hobby Lobby will not be sufficient.
Quick question: I may have missed this in the post, but could you tell me what seam allowance you used?
Thank you for the excellend tutorial. I was able to make my own casserole carrier, and I can tell you I am not that great with a sewing machine!
are you selling these by any chance??
are you willing to sell any of these? I dont have the time to make one or the skill but it would be the perfect gift for my sister!please please please let me know!
Thank you for taking the time to do this tutorial! I did notice a mistake in the directions. Thought I would point it out. When telling us this.
“Cut two pieces of Insul-Bright to the following sizes: 30″ X 15″ and 37″ X 12″
Cut two pieces of fabric slightly larger then the 30″ X 15″ and 37″ X 12″ pieces of Insul-Bright.” Shouldn’t it say cut 2 pieces of fabric for EACH piece of insul-bright? And maybe just have it say cut one piece of insul-bright 30 x 15 and another 37×12..
I had to read it over several times to fully understand. Going to make it now… Cross your fingers!
I’m with you! I read the directions over and over and was so confused! I read through all the comments to find out if I’m missing something or if the directions missed that or if I was just an idiot. I’m so glad to have seen your post, I was starting to think I was crazy!!
I’m about to start mine and will be following your post about cutting TWO pieces of 30×15 and 37×12 fabric!
Hope yours went well!
Trying to make this carrier now as a Christmas gift. I am new at sewing (self teaching) and was wondering what seam allowances you used?
Also, after trimming, what are the dimensions of fabric? The same as the Insul-brite? 30 x 15 and 37 x 12?
I just finished making this for my sister in law for Christmas. It turned out so great. Thanks do much for sharing you project.
i am not talented when it comes to sewing but I decided to make this carrier for two of my friends for Christmas and … I DID IT! If I can anyone can! lol One mistake I did make was I bought velcro with a sticky back (I didn’t realize this til I was about to put it on). I chose to try it anyway and it was making my needle too sticky so sewing it will not be an option and it doesn’t stick well enough on it’s own…so the moral of my story is make sure you buy sewing velcro!
I just made the casserole carrier for a grand daughter. I left the ends open on
the inside piece so I could add a small piece of board for more stability. You can remove the board so you can laundry the carrier. Thanks for the great idea!!!
great pattern! It made a perfect gift for abridal shower. and was really straight forward to put together. Made a quick make!
I made one of these and then my daughter and I made two more for gifts! They are gorgeous! I linked to your tutorial at my blog: http://athomemyway.blogspot.com/2013/03/casserole-carrier.html
THANK YOU FOR THE INSPIRATION! We love them! They are just awesome!
Gina
This is beautiful and such a neat idea! I can’t wait to make one! Thanks!!
I precisely wished to thank you so much once more. I do not know the things I might have sorted out in the absence of the pointers contributed by you about that theme. It had been the troublesome concern in my position, however , taking note of the professional approach you dealt with it forced me to weep over delight. I’m just thankful for the information and as well , pray you know what an amazing job you are always getting into teaching many others through the use of your web blog. I’m certain you haven’t come across any of us.
Wonderful blog you have here but I was curious if you knew of any message boards that cover the same topics talked about here?
I’d really like to be a part of group where I can get feedback from other experienced people that share the same interest. If you have any suggestions, please let me know. Thank you!
I’d like to try this pattern. Has anyone used a “quilted” fabric for this?
I needed a quick casserole carrier and so ‘cheated’ I used pre-quilted fabric, one side red and the other green. It worked well and took about an hour to make.
Wow that was unusual. I just wrote an very long comment but after I clicked submit my comment didn’t show up.
Grrrr… well I’m not writing all that over again. Anyhow, just wanted to
say excellent blog!
Am I the only one who thinks a less vibrant fabric would have made this tutorial MUCH easier to follow?
I’m going to have to find another tutorial…this one is making my eyes hurt. Sorry!
Great tutorial! Having fun making one but I have a possibly silly question. What are you using to mark the fabric? Something that comes off?
Thank you for the in-depth details to make the casserole cover. Just finished my second one, both of which will be Christmas gifts this year.
New at sewing and couldn’t wait to try out your casserole carrier for a gift for my daughter. Two questions tho. I’m wondering if it wouldn’t be a good idea to mention in your tutorial which way to lay the peices of insta bright, as it says on the package to make sure the shiny side is facing toward the casserole dish. Also, maybe mention what your seam allowance was when you sewed the seams. I did use 1/4 inch, which I thought was how it looked in the pictures. Other than that, thank you so very much for this tutorial. It was fun.
Hi! Thanks so much for the tutorial! I made three of these for gifts, did a couple of short-cuts but they turned out great!! I linked to this post on my blog.
I’m just in the middle of making this delightful carrier and have a quick question – is there a reason why one side is longer than the other (“right side 10 inches” ) and not evenly spaced top to bottom (“9 inches from the bottom”)?
Simply want to say your article is as astounding. The clearness in your publish is simply excellent and that i can think you’re a professional on this subject.
Fine together with your permission let me to grasp your feed to
keep updated with imminent post. Thank you a million and please
continue the rewarding work.
The most practical and greatest idea for the holidays! I will definitely be making a few as gifts. Thank you so much for this detailed tutorial! You’re talented! Keep up the great work!
I just completed this finally….. and it turned out perfect and was super easy. Thank you. Your instructions were great. The only change I did was make the one section 40in long.
If some one wishes expert view concerning running a blog after that i advise
him/her to visit this webpage, Keep up the fastidious work.
Hello! I just wanted to ask if you ever have any trouble with
hackers? My last blog (wordpress) was hacked and I ended
up losing several weeks of hard work due to no backup.
Do you have any solutions to stop hackers?
Hello, this weekend is pleasant in favor of me, as this occasion i am reading
this impressive informative article here at my home.
I have made this carrier numerous time!! Thanks for the great pattern! Here is a link to my blog for the last one I made….. Nancy
http://thisoldhouseinnewliberty.blogspot.com/2014/11/a-long-overdue-gift.html
Thanks for the awesome pattern, it is my go to Bride gift! Nancy
Here is a link to my blog for the last one I made! Nancy
http://thisoldhouseinnewliberty.blogspot.com/2014/11/a-long-overdue-gift.html
Nowadays, computer keep track of exist caused a rift into CRT afterward LCD monitors.
CRT keep track of takes place built with a CRT overseer peek and experience reminiscent of the TELEVISION.
It is primary drawbacks are the load furthermore dimensions.
In recent times, live next to influence out of your wore
out (bar using zastosowanimi with the aim of calm down effect improve on) on behalf of LCD overseer, that is named
for the water precious stone panel, which restored the been aware of CRT
draw tube. The price with the smaller measurements from the crest
can often be cut picture quality.
This site was… how do I say it? Relevant!!
Finally I have found something that helped me. Thanks!
Do you think it matters which side of the insul bright fabric is faced in towards the hot casserole dish?
Hi there. Simply just planned to request a simple dilemma. cddeaedegddf
I am getting prepared to make your casserole carrier and have noticed that the Insul-Bright paper says to “Use with at least one layer of cotton batting…to absorb condensation”. Do you feel this is a necessity or did you find using just the Insul-Bright between your two fabric pieces was sufficient?
Hi my loved one! I want too say tgat this article
is amazing, great written and include almost
all significant infos. I would like to look more posts like this .
Really Nice Information,Thank You Very Much For Sharing.WordPress Development Company
I forget what side of the insul-brite goes where. I think the side with the metalic looking pieces goes toward the heat. Is that right.
I’m particularly astounded with your writing skills together with with all the data format for a web site.. Sale Is that this any paid topic or maybe do you transform them oneself? At any rate keep up to date the excellent high quality publishing, it is uncommon to look a fantastic website just like it nowadays.
Love this!! I am in the process of making one of these now it’s going to be a cupcake/casserole carrier for a friend, she is always bringing cupcakes to work! Anyways thanks for the tutorial and I will email you a picture when I’m done ?
Lovely! I’m brasilien and I’ll try to do it someday.
Parabéns! (Congratulations)
I made your casserole cover. Like all patchworkers I tweaked it a bit to suit my needs but it was a great pattern
http://ozzypipquilts.blogspot.com.au/2015/11/wip-wednesday_25.html
Wish you had used a plain fabric, maybe light and one bit darker as I had a very hard time seeing the marks, etc. My eyes arn’t what they used to be. I would like something simpler for the the straps too. Otherwise very nice…
Maybe I overlooked it but according to your materials list I didn’t see flannel. If it wasn’t listed, may I recommend an edit for the future.
THANK YOU THANK YOU THANK YOU! I made three of these for Christmas gifts and they turned out so well and the recipients were so happy to get them. No more potato casserole arriving at family holiday dinners wrapped in towels!
This carrier looks useful, thanks for the tut.
I went ahead and cut the main pieces but when I got to the handles the length of the fabric left was only 36″. Do you think even though it’s 4″ short that it will still work for the project? Thanks (next time I will read ahead and plan for it)
Nowhere else on the internet could I read a tweet that included Crypto market news the phrase, “Pretty sure I just found a doppelgänger of my dead weasel…”. Keep it weird 🙂
Hello, Excellent writing!
Your website is awesome. You have shared really a profitable tutorial. I will surely try this tutorial at home.
Tonuwdohc! That’s a really cool way of putting it!
And I thought I was the sensible one. Thanks for setting me stithgra.
So excited I found this article as it made things much quckrei!